At a glance
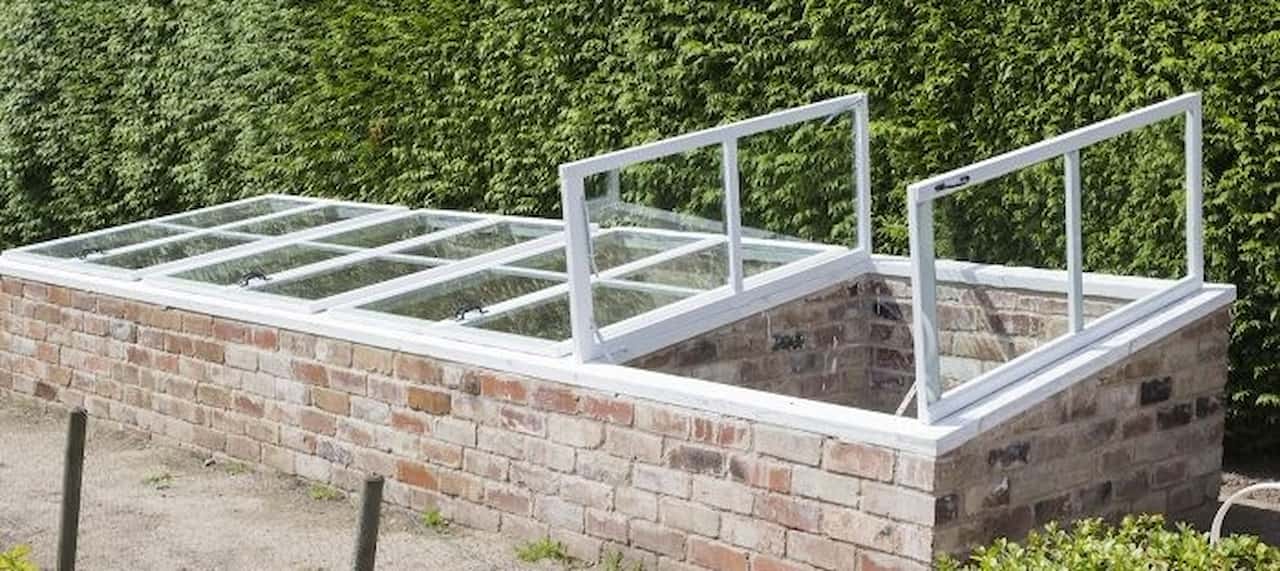
A brick cold frame is one of those things that looks like a lot of work and turns out to be about two weekends, a bag of mortar, and a pile of old bricks. What you get at the end of it is a growing structure that will still be standing when everything around it has rotted, warped, or blown over. I have had a timber cold frame. It lasted nine years before the base went. The brick one it replaced has not required a single repair in six years and at this rate never will.
The other thing bricks give you is thermal mass. Every hour of winter sun is absorbed into the walls and given back slowly through the night. On a clear March evening when the outside temperature drops to two degrees, the air inside a brick cold frame sits one or two degrees warmer than inside a timber-sided equivalent. That is the difference between seedlings that survive the night and seedlings that do not.
Why build with bricks rather than timber
The honest answer is longevity, and the fact that timber cold frames almost always disappoint you eventually. The base rots. The joints open up. The frame warps and the lid stops fitting properly, which means all the warmth you thought you were trapping is seeping out through a gap where two pieces of wood no longer meet. Brick does none of these things.
There is also the thermal mass argument, and it is a good one. Dark bricks absorb solar heat during the day and release it slowly at night, keeping the inside of the frame warmer than it would otherwise be. Reclaimed engineering bricks are ideal for this. They are dense, non-porous, and dark-coloured, which means they absorb and hold heat better than lighter modern facing bricks. If you can get hold of some old blue-black engineering bricks from a reclamation yard, use them.
Bricks are also a good use of what might otherwise be a skip-load. Anyone who has had building work done, or who lives within collection distance of a demolition or renovation, can usually find reclaimed bricks for nothing or next to nothing. The cold frame I built used sixty bricks that came from a neighbour’s demolished garden wall. Not one was bought.
Design your cold frame around the lid, not the other way around
The lid, traditionally called the “light”, is what you build the brickwork to fit. Get a lid first. Size the cold frame second. This is the part most people get backwards, and it is the reason they end up cutting bricks to match an approximate frame or discovering the lid does not sit flat.
The best lids are old sash windows. Salvage yards, Facebook Marketplace, and anyone having double glazing installed are your sources. The glass is already framed, the dimensions are fixed, and the whole thing is usually free or close to it. A reclaimed sash panel typically runs somewhere around 750mm x 900mm to 900mm x 1200mm, though sizes vary. Measure it before you lay a single brick.
If you cannot find a window, make a lid from a timber frame and twin-wall polycarbonate. Use 47x47mm pressure-treated softwood, join the corners with halving joints or timber connectors, and glaze with 6mm twin-wall poly. It is lighter than glass, safer where children are around, and you can cut it to exactly the size you want. The only downside is slightly less light transmission than glass, which matters more in deep winter than in spring.
The slope matters. The back wall of the cold frame should be one or two brick courses higher than the front. Not more than that. Too steep and you lose interior growing depth; you also get water pooling at the lid hinge in heavy rain rather than running off cleanly. Two extra courses at the back gives a slope of about 150mm over a typical 750mm depth, which is enough to shed rain and capture low winter sun without compromising the growing space inside.
What you’ll need
A brick cold frame is a small masonry project. The bricklaying itself is straightforward and does not require trade skills, but it does require patience and a spirit level that you actually use at every course rather than occasionally glancing at. Get the first course right and the rest follows. Rush it and every course above compounds the error.
Building the walls
Mark the footprint first with pegs and string. Get it square by measuring both diagonals: if they match, you are square. If they do not, adjust the corners until they do. This matters because a cold frame that is not square will have a lid that sits on two corners and not the other two.
You do not need deep foundations for a structure this low, but you do need a solid, level base. On firm ground, a rammed gravel base 100mm deep under each wall line is enough. On soft clay soil, a thin concrete footing 100mm deep and 200mm wide under each wall is advisable. Clay moves with frost cycles and a cold frame sitting on clay without a footing will shift enough over winter to crack the mortar joints. It is not a lot of work and it is worth doing once.
Lay the front wall first. This is the shortest wall. Two or three brick courses at the front gets you to around 150-225mm height. Then lay the two side walls, which taper from front to back. The cleanest way to handle the taper in a single-skin wall is to lay each course level across the full length and accept that the top course on the front-facing side sits one or two courses lower than the rear-facing side. You can cut bricks at an angle to make a clean sloped top, but for a garden cold frame a stepped arrangement with the lid resting on the highest course works fine.
The back wall goes in last and is the tallest, typically four or five courses, putting it at 300-375mm. Use a spirit level on every course. Not every few courses. Every one. It takes thirty seconds and it is the only thing standing between you and a wall that leans slightly and catches your eye every time you look at it.
Mortar mix: four parts sharp sand to one part ordinary Portland cement. This is a slightly lean mix that suits both new facing bricks and reclaimed softer bricks. If your bricks are very old and soft, go to five parts sand to one part cement. Cement-heavy mortar is harder than soft old brick and the differential movement causes the brick face to spall off over time, not the mortar joint. Ten millimetre joints throughout. Lay a full mortar bed for each brick, butter the header end, and press firmly into place. Once the walls are up, leave them for at least 48 hours before putting any load on them.
Mortar and reclaimed bricks. Never use a cement-heavy mortar on soft old reclaimed bricks. Portland cement mortar stronger than 3:1 will outlast the brick face, causing spalling as the harder mortar cracks the softer brick around it. Use 4:1 or 5:1 sharp sand to cement on anything that looks like it came off a Victorian terrace or older.
Making and fitting the lid
If you are using a reclaimed sash window, the frame is already done. Clean the glass, check the putty, and replace any cracked panes before fitting. A cold frame lid does not need to be perfect but it does need to be intact. Every crack is a gap through which warm air escapes.
For a polycarbonate lid, cut the frame timber to match the outer dimensions of the cold frame opening. Halving joints at each corner are the neatest option. Drill the polycarbonate before screwing. It cracks if you drive screws without a pilot hole. Leave expansion gaps at each edge: polycarbonate expands and contracts roughly 6mm per metre over a thirty-degree temperature swing. Fix with roofing screws and polycarbonate washers, not standard wood screws with a hammer.
Fix a pressure-treated timber batten along the top of the back wall. This is the hinge rail. It sits flush with the top of the back wall and gives the hinges something solid to bite into. Raw brick mortar is not a reliable fixing point for hinges. Drill into the batten, not the brickwork. T-hinges or strap hinges work well. Fit two for a small lid, three for anything wider than 900mm.
The lid should open fully without requiring you to hold it. A simple notched prop cut from scrap timber keeps it up while you work inside. Cut three or four notches at different heights and you have adjustable ventilation control without spending anything.
Fit a draught strip along the front edge. A strip of foam draught-excluder tape along the front and side edges of the lid frame makes the biggest single difference to overnight temperature retention. A gap of even a few millimetres loses heat fast on a still winter night. It costs almost nothing and takes five minutes.
Ventilation is what determines whether plants live or die
A cold frame without ventilation management is just a way to kill seedlings faster. On a still, clear day in March, a completely sealed brick cold frame reaches thirty-five to forty degrees inside within an hour of sunrise. That temperature cooks lettuce seedlings. It bakes the compost surface into a crust. It wilts anything that cannot move away from it. I have killed a full tray of plug plants this way. A whole afternoon’s potting on, gone by lunchtime because I forgot to open the lid before leaving for work.
The rule is straightforward. If the outside temperature is above ten degrees and the sun is out, open the lid. The monthly guide below covers how much to open it and when.
If you cannot be there to open the lid each morning, fit a wax-cylinder automatic vent opener. These need no electricity and no batteries. As the air inside warms up, the wax expands and pushes the lid open. As it cools, it closes again. They cost fifteen to twenty-five pounds and pay for themselves in the first season by preventing the losses that happen the one day you forget.
What to grow, and when to grow it
A brick cold frame earns its space in every month of the year if you plan it properly. The extra thermal mass means it holds frost at bay slightly better than a timber-framed equivalent, which matters most in November and February.
Spring is hardening off season. Tomatoes, chillies, courgettes, and cucumbers raised under glass indoors need a week to ten days in the cold frame before they can go into open ground. Do not rush this. Plants that skip hardening off go soft and collapse at the first cold night. Move them gradually from barely cracked to fully open over the course of a fortnight.
Keep two dark-coloured bricks inside the frame against the back wall. They absorb heat on sunny days and release it slowly after the lid closes for the night. It is an old allotment trick that costs nothing and measurably works. The difference is one or two degrees overnight, which on a borderline frost night is the difference that counts.
Share on socials: