At a glance
Homemade compost is the single best soil improver available to a UK gardener and it costs nothing except the time to collect and manage the raw materials. A well-made compost heap converts kitchen and garden waste into a rich, biologically active material that improves soil structure, feeds plants, retains moisture and suppresses some soil-borne diseases. It takes 3-6 months to produce in summer, 6-12 months in winter, and the result is a product that would cost several pounds per bag to buy.
The barrier most people encounter is uncertainty about what to add, what the correct balance is and why their heap is not working as expected. This guide demystifies the process. Composting is fundamentally simple – it requires organic material, moisture, air and time. Understanding the green-brown balance and a few basic management principles is all that is needed to produce excellent compost reliably. If you have an allotment, a productive compost system is central to success – the best allotment plots are invariably those where getting the most from your allotment starts with returning organic matter to the soil every season.
Why make your own compost
Beyond the obvious financial saving, homemade compost is genuinely superior to most bought alternatives in its biological activity. Freshly made garden compost contains a diverse population of beneficial soil organisms – bacteria, fungi, worms, beetles – that improve soil structure and plant health in ways that sterilised bagged products cannot replicate. Applying homemade compost consistently over several years transforms the biology of garden soil in a way that no individual product purchase can achieve.
What to add – greens and browns
Successful composting requires a balance of nitrogen-rich “green” materials and carbon-rich “brown” materials. Greens provide the nitrogen that fuels the microbial activity that breaks down the pile. Browns provide the carbon structure that keeps the heap aerated and prevents it becoming a smelly, anaerobic mass. The ideal ratio is roughly 50:50 by volume.
Grass clippings are the most commonly misused compost ingredient. Added in thick layers, grass clippings compact into an airless, slimy mat that smells unpleasant and breaks down very slowly. Mix grass clippings thoroughly with dry brown material – torn cardboard or straw – before adding to the heap. A thin layer of clippings mixed well with browns adds nitrogen effectively; a solid layer is one of the most common reasons a compost heap fails to work.
What not to add
Cooked food and meat attract rats and other vermin – raw vegetable peelings are fine but anything cooked or containing meat or fish is not. Diseased plant material should be binned rather than composted – home heaps rarely reach temperatures high enough to kill persistent pathogens like club root or tomato blight. Perennial weed roots – bindweed, ground elder and couch grass – survive composting and will grow in any bed the compost is applied to. Weeds that have already set seed should not be composted as the seeds remain viable. Cat and dog faeces can contain pathogens harmful to humans. Glossy paper and plastic does not break down.
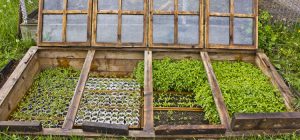
Building and managing the heap
A compost heap needs to be large enough to retain heat – the minimum effective size is approximately 1 cubic metre (1m x 1m x 1m). Below this size the heap loses heat too rapidly for efficient composting. A purpose-made compost bin of 300-400 litres or a simple timber frame bay built from pallets works well. Siting the heap on bare soil rather than concrete allows worms and other beneficial organisms to enter from below.
- 1Start with a layer of coarse browns on the base – a layer of coarse material such as wood chip, torn cardboard or small branches improves air circulation from below and prevents the heap becoming waterlogged at the base.
- 2Add greens and browns in alternating layers – build the heap in alternating layers of green and brown material, roughly equal in volume. Mix each layer lightly rather than leaving distinct bands – mixing improves air circulation and contact between materials.
- 3Keep the heap moist but not wet – the heap should feel like a wrung-out sponge – moist throughout but not dripping. In dry summer weather, water the heap occasionally. In very wet weather, cover with a piece of old carpet or cardboard to prevent waterlogging.
- 4Turn the heap every 4-6 weeks – turning the heap moves material from the outside to the centre, introduces fresh air and significantly speeds up decomposition. A heap turned regularly can produce finished compost in 3-4 months in summer.
Speeding up the process
How and when to use compost
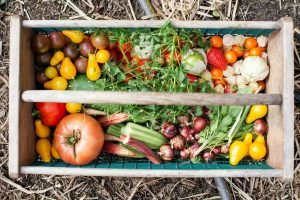
Finished compost is dark brown to black, crumbly in texture and smells of damp earth rather than the original materials. Any remaining undecomposed material can be returned to the new heap as starter material. Apply compost as a mulch on beds and borders in autumn and spring, as a soil improver dug into vegetable beds before planting, and as a component in raised bed soil mixes. Two to three inches of compost applied annually to garden beds produces a dramatic improvement in soil quality and plant health over 2-3 seasons – the single most effective thing most UK gardeners can do for their soil.
Share on socials: