At a glance
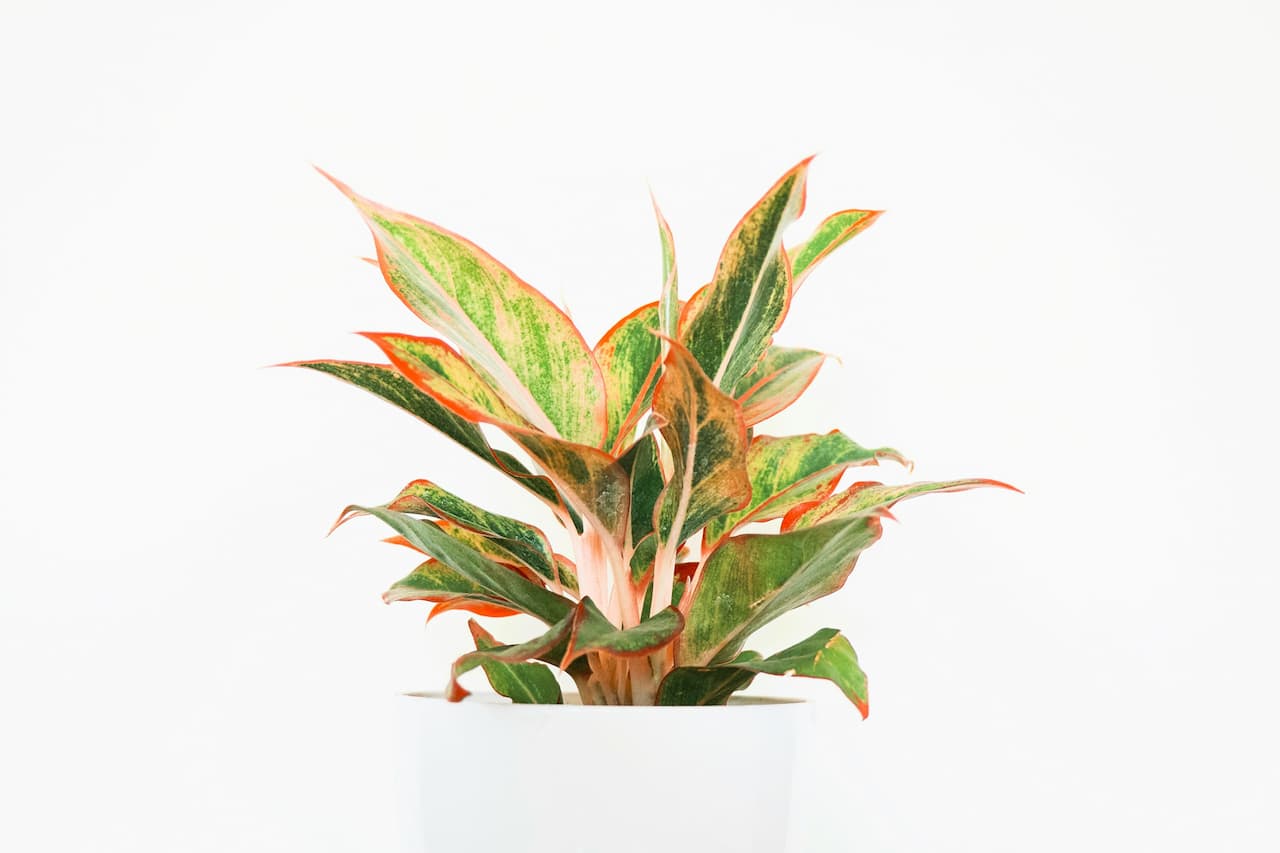
The croton – Codiaeum variegatum – produces some of the most vivid leaf colour available from any UK houseplant, combining red, orange, yellow, green and purple in patterns that vary between varieties. That colour is directly tied to light levels. A well-lit croton blazes. The same plant in low light produces dull, predominantly green leaves. The plant is also famously sensitive to change – being moved, placed in a draught, allowed to dry out, or exposed to a sudden temperature drop can all trigger dramatic leaf drop within days. Get the position right from the start, never move it, and manage the conditions consistently and it will reward you with years of spectacular colour.
Choosing the right position
The position decision is the most important decision you will make with this plant. Every other care element can be adjusted and corrected. The position, once the plant is established, cannot be changed without triggering leaf drop. Choose before buying, not after.
Once the plant is in position, leave it there permanently. Not until a better spot becomes available. Not when you want to rearrange the room. Permanently. The croton’s entire reputation for difficulty comes from being moved.
Light and colour
The red, orange and yellow pigments in croton leaves are produced in direct response to light intensity. More direct sun means more vivid colour. Less light means the leaves become progressively greener. This is not reversible for existing leaves – a green leaf stays green. New leaves emerging after conditions improve will be fully coloured from the moment they unfurl.
In UK winters, when days shorten and the sun angle drops, supplement with a full-spectrum LED grow light positioned 20 to 30 centimetres from the plant on a 12 to 14 hour daily timer. This maintains colour year-round without the risk of moving the plant to a different window for winter, which would cause leaf drop from the move itself.
Humidity
The croton needs 40 to 60 percent relative humidity. Centrally heated UK homes in winter typically drop to 20 to 30 percent. At these levels the plant desiccates at the leaf margins – brown crispy edges spreading inward – and becomes significantly more vulnerable to spider mite infestation.
The most effective solutions in order: a room humidifier running for several hours daily near the plant; a pebble tray – a shallow tray of gravel filled with water to just below the pebble surface, with the pot sitting above the waterline; daily misting as a supplement to either of the above. Misting alone is insufficient – the effect dissipates within minutes in a dry heated room.
Always mist with room-temperature water. Cold water applied to warm leaves causes permanent white spotting at every droplet contact point. Tilt the mister to reach leaf undersides where early spider mite colonies establish. A small hygrometer near the plant confirms whether humidity management is working – above 50 percent is adequate; below 40 percent despite misting means you need a humidifier or pebble tray.
Temperature
The croton prefers 18 to 27 degrees Celsius and must never drop below 15 degrees. Below 15 degrees the plant shows stress rapidly. A sudden drop to 10 degrees or below triggers immediate and significant leaf drop.
Stability matters as much as level. A room that holds a steady 20 degrees throughout the day and night is better than one that reaches 25 degrees when heating runs but drops to 14 degrees overnight. The plant reads temperature fluctuation as a stress signal every time it occurs. Avoid proximity to radiators that cycle sharply, exterior windows that radiate cold at night, exterior doors opened frequently in cold weather, and air conditioning units.
Watering
Keep the compost consistently moist during the growing season without ever waterlogging it. The croton shows stress before visible wilting – by the time it looks limp it has already been dry for too long. Check the compost when the top 2 centimetres have dried. Water thoroughly at that point – fill the pot until water runs freely from the drainage holes, let it drain, empty the saucer within half an hour. In spring and summer this typically means watering once a week. In autumn and winter every ten to fourteen days, checking each time rather than following a fixed schedule. Always use room-temperature water.
Underwatering causes the plant to shed leaves to reduce its water-losing surface area. Overwatering causes root rot – the roots can no longer take up water even when the compost is wet, so the plant appears drought-stressed while sitting in moist compost. Distinguish between them by checking the compost: bone dry confirms underwatering; persistently wet compost with an unpleasant smell indicates root rot.
Compost, pot choice and repotting
Use a standard peat-free multipurpose compost mixed with 20 to 30 percent perlite. Drainage holes are essential. Pot size should match the root ball without significant excess – an oversized pot holds moisture the roots are not using, which creates root rot conditions even with correct watering. Plastic or glazed ceramic pots retain moisture longer than terracotta and are usually the better practical choice – terracotta’s porous walls cause faster drying and more frequent watering to maintain consistent moisture.
Repot only when clearly pot-bound: roots circling the walls tightly when removed from the pot; compost drying within a day or two of watering consistently; visible root compression with little free compost remaining. Spring only. Move up one pot size. Disturb roots minimally. Remove dead or blackened roots. Do not water for five to seven days after repotting. Expect some leaf drop – it happens even when repotting is done correctly. A struggling plant that is not pot-bound should not be repotted.
Feeding
Seasonal care
Diagnosing leaf drop
Diagnosing colour loss
Leaves fading to predominantly green is caused by insufficient light, overfeeding with high-nitrogen fertiliser, or the chronic stress of any inadequate condition maintained over months. Already-faded leaves will not recover – improved conditions only show in new leaves emerging after conditions improve. Restore adequate direct light, switch to a balanced or potassium-rich feed, and address whatever chronic condition is responsible.
Pests
Pruning and propagation
Pruning encourages branching from a single-stemmed upright plant into a denser, bushier form. Always wear gloves – the white latex sap that bleeds from any cut is a skin irritant and eye hazard. Prune in spring only, cutting cleanly just above a leaf node with sharp, clean secateurs. Hard pruning – cutting back to 20 to 30 centimetres above the compost – rescues a leggy plant. Done in spring, recovery is typically complete by autumn.
For stem cuttings: take 10 to 15 centimetres with two to three leaf nodes, allow the cut end to dry for 30 minutes for the latex to seal, dip in rooting hormone, insert into moist perlite under a propagation cover in warm bright indirect light. Rooting takes four to eight weeks. For air layering: remove a 4 to 5 centimetre ring of bark from a healthy stem, pack with damp sphagnum moss, seal in plastic film at both ends. Roots appear through the plastic in four to eight weeks. Sever below the rooted section and pot into moist compost.
The latex sap
Every part of the croton contains white latex sap that flows freely from any cut or damaged surface. It causes contact dermatitis, serious eye irritation requiring 15 minutes of rinsing, and vomiting if ingested. Effects are more pronounced in cats and dogs. Keep the plant away from pets and young children. Always wear nitrile gloves when pruning or repotting. Wash immediately if sap contacts skin. Allow cut ends on cuttings to dry for 30 minutes before inserting into propagation medium.
Water quality and cleaning
The croton is sensitive to fluoride accumulation from tap water. Fluoride builds up with repeated watering and causes sharp-edged brown tip burn at the very ends of leaves – distinct from the broader browning of humidity damage. Collected rainwater eliminates this. If using tap water, flush the compost heavily twice a year to remove accumulated minerals. Always allow water to reach room temperature before applying it.
Wipe each leaf with a cloth dampened in room-temperature water, supporting the leaf and wiping from base to tip. Do not use leaf shine products – they block the stomata. For a heavily dusty plant, a lukewarm shower rinses all surfaces simultaneously and dislodges early pest colonies from leaf undersides.
Buying and recovery
Take the plant directly to its permanent position in one move. Multiple intermediate positions mean multiple stress events. Place it, water once if bone dry, and leave it alone for six to eight weeks. Initial leaf drop in the first one to two weeks is the plant processing accumulated transition stress – if conditions are right and it is left undisturbed, the drop will stop and new growth will follow.
To recover a heavily defoliated plant with firm green stems: address active pests first, check root health and cut back any rot, then stabilise all conditions and wait. Feed at quarter strength only once several new leaves are established. Do not move the plant or make additional interventions during recovery. Full recovery takes a complete growing season.
Choose the position before you buy the plant, not after. Scout your home for the brightest, warmest, most stable location – away from draughts, cold windows and cycling radiators. Set up humidity management before the plant arrives. Place it in position on day one and leave it. The croton’s entire reputation for difficulty comes from being moved around.
Share on socials: