At a glance
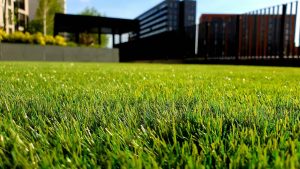
Lawn edging is any material or tool used to create a clean, defined boundary between a lawn and the surrounding beds, paths, driveways or paving. Without edging, grass spreads horizontally into beds through runner growth, soil from beds falls onto the lawn, and weeds cross freely between the two areas. The visible result is a ragged, undefined line that makes even a well-maintained garden look unkempt. Good lawn edging eliminates this by physically separating the two areas so each can be managed independently.
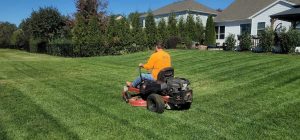
The secondary benefit is reduced maintenance over time. Properly installed lawn edging means less hand-trimming, less re-cutting of eroded bed edges and less time pulling grass runners from flower beds. The upfront cost in time or money pays back in reduced weekly effort across every season.
What lawn edging is and why it matters
A lawn without any form of edging is in a constant slow battle against the rest of the garden. Grass spreads by surface runners and underground rhizomes, and without a physical barrier it will colonise flower beds, gravel paths and paving gaps within a few seasons. Equally, soil from raised beds gradually falls onto the lawn margin, creating an uneven, undefined join. The result is a significant additional maintenance burden every time the garden is tidied.
The right edging removes this entirely. Metal strip edging acts as a root barrier that grass cannot cross horizontally. Timber or brick edging creates a visible physical separation. Either way, the two areas stay where they were intended and the join between them can be maintained quickly with a single pass of edging shears. Over a full season, this adds up to a meaningful saving in time and physical effort.
The main types of lawn edging
Each edging type has different strengths, installation requirements and lifespans. The table below summarises the key characteristics to help narrow the choice before reading the detail sections.
Steel edging
Steel edging is the professional choice for a reason. Once installed, it creates a clean, precise line that holds its position for years without any intervention. It is available in galvanised steel, powder-coated finishes, and weathering Corten steel, which develops a distinctive rust patina over the first few months. Most steel edging is flat strip held in place by integral spikes or separate anchor pegs driven at an angle through welded sleeves at each joint. The spiked anchoring system resists frost heave and lateral soil movement.
Standard strip heights range from 75 to 150 millimetres. A 75 millimetre strip suits most domestic gardens: enough depth to resist movement without being difficult to install. Deeper strips at 100 to 150 millimetres are better on heavy clay soils that expand and contract with moisture, or on sloping ground where the edging needs to resist additional lateral pressure. The strips are installed by hammering flush with the soil surface so a mower can pass over without catching. Leaving the top edge even fractionally proud is the most common installation error and causes both a trip hazard and mower damage. Corners are achieved by cutting with an angle grinder or hacksaw, or by using pre-formed 90-degree connector pieces. For flowing curves, the strip bends by hand or with a jig, and it holds the curve without springing back.
Install edging flush with turf level, not proud. The mower should be able to run along the edging with the outer wheel on the edging surface. If the edging sits higher than the lawn surface, every mowing pass is an opportunity for damage to both the tool and the edging.
Aluminium edging
Aluminium edging works on the same principle as steel but is lighter and more flexible, making it a better choice for tight curves and complex bed shapes. It does not rust, which removes any long-term surface treatment requirement. Standard tin snips cut aluminium cleanly, requiring less effort than the angle grinder needed for steel. The main limitation of aluminium compared to steel is reduced rigidity under load. In areas where wheelbarrows, mowers or heavy foot traffic regularly cross the edge, aluminium can deform over time where steel would not. For most garden borders and bed edges that see light traffic only, the difference is not meaningful, and the greater ease of installation on curves is a genuine advantage.
Plastic edging
Plastic edging quality varies more than any other category. The most reliable plastic edgings are thick-walled, HDPE-grade profiles in corrugated or rigid formats with integral anchoring pegs. Thin, wavy plastic rolls sold in budget packs become brittle in cold weather and buckle under mower pressure within a season or two in UK conditions. If choosing plastic, UV-stabilised HDPE-grade material is the minimum specification worth considering. The anchoring pegs supplied with most plastic edging are often too widely spaced for clay soils, where frost heave will push the edging out. Installing additional steel pegs at intervals of 30 to 40 centimetres rather than the standard 50 to 60 centimetres gives substantially better retention. The main advantages of plastic remain its low cost, wide availability, and ease of cutting and installation without specialist tools. For informal areas where appearance is secondary to function, quality plastic edging is entirely adequate.
Rubber edging
Recycled rubber edging has better cold weather performance than standard plastic: it stays flexible at sub-zero temperatures where plastic becomes brittle and cracks. It is available in interlocking tiles or rolled lengths, and the interlocking format allows individual damaged sections to be replaced without disturbing the rest. Rubber is heavier than plastic and slightly harder to manoeuvre into position. Its dark colour suits naturalistic planting but is less crisp-looking than metal. It is not the premium aesthetic choice, but it is a practically sound option for gardens where cold winters make plastic durability a concern or where a simple, functional barrier is the priority.
Timber edging
Timber edging divides into two main formats: treated board edging and log roll. Each suits different situations and has different installation requirements and limitations.
Neither timber format provides a complete root barrier in the way that metal edging does. Grass runners will grow under timber edging at soil level unless a separate root barrier membrane is laid beneath it. Treating exposed faces with wood preservative annually, particularly at the soil contact line where rot begins first, significantly extends the lifespan. Untreated timber in contact with UK soil typically fails within two to three years. Log roll sections held together by galvanised wire can separate over time as the wire corrodes: reinforcing with additional galvanised wire at installation reduces this.
Installation
The installation process for strip edging (metal or plastic) follows the same core sequence regardless of material. For newly seeded or recently laid turf, wait a minimum of one full growing season before installing strip edging, as the edge-cutting and soil disturbance can disturb freshly established roots.
Maintenance
Metal and rubber edging requires almost no maintenance beyond cleaning off soil accumulation and re-tapping any sections that have heaved after a hard frost. Check the full run each spring before the growing season begins and hammer down any raised sections immediately. Plastic edging needs more frequent checks: the anchoring pegs can fail in clay and the edging can shift over winter. Replace failed pegs promptly rather than waiting for the edging to move out of line. Timber edging should be treated with wood preservative annually, concentrating on the face exposed to soil contact. Brush the preservative on in dry conditions in early spring and again in late autumn.
Regardless of edging type, the joint between the edging and the lawn needs trimming periodically through the growing season. Strip edging reduces but does not eliminate the need to cut back overhang. A long-handled edging shear cuts the vertical face cleanly without kneeling. A half-moon edging iron restores a precise cut edge when the lawn has grown over the edging lip.
Edging tools
The tool used to maintain an installed edge matters as much as the edging itself. The table below covers the four main options and what each is suited to.
Choosing the right edging
The right choice depends on the garden’s style, soil type, budget and how much installation effort you are prepared to invest. The cards below summarise the five main scenarios.
Common problems
The table below covers the most frequently encountered failures with lawn edging, what causes each one and how to fix it.
Share on socials: