At a glance
Shallots are one of the most satisfying crops you can grow in a UK raised bed. Plant a single set in spring and by midsummer it will have multiplied into a cluster of six to twelve individual bulbs – that multiplication factor makes them feel almost magical compared to crops that simply grow bigger from seed. They are also more intensely flavoured than standard onions, easier to manage than garlic and store reliably through winter when kept in the right conditions.
Unlike bulb onions, which require a long growing season and careful timing to produce reliably, shallots are forgiving and straightforward from the moment the first set goes into the ground. They tolerate a range of soils, rarely suffer serious pest or disease problems when given reasonable care, and the harvesting window is generous enough that missing the exact right day by a week causes no harm. For any gardener who enjoys cooking, home-grown shallots are one of the highest-value crops the kitchen garden produces. They are not particularly cheap to buy in shops – particularly the better varieties – and the flavour of a freshly harvested home-grown shallot is noticeably superior to anything that has spent weeks in a supermarket distribution system.
About shallots
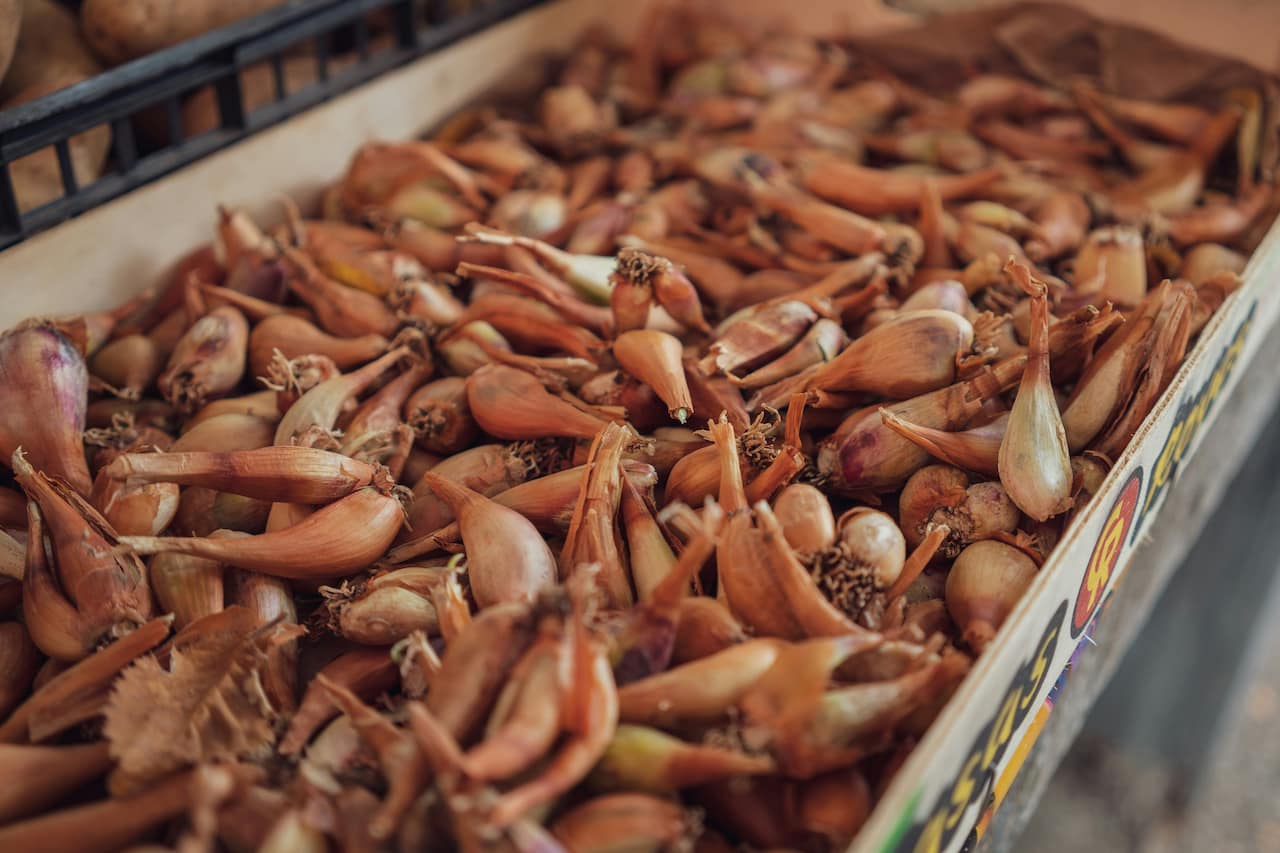
Shallots (Allium cepa Aggregatum group) are closely related to onions but form clusters of smaller bulbs rather than a single large one. Each planted set produces a clump of between six and twelve new bulbs, all attached at the base and splitting apart as the season progresses. This multiplying habit is the defining characteristic of the crop and what makes them so productive from a small planting – one set becomes a handful of bulbs, a row of twenty sets becomes a winter’s worth of cooking.
The flavour is more complex and sweeter than a standard onion, with a mild, slightly garlicky depth that makes shallots particularly valued in French cooking and in any dish where the onion note needs to be present but not dominant. Raw they are more approachable than a large onion; cooked they caramelise more readily and develop a sweetness that makes them the preferred choice for sauces, dressings and roasted dishes. There are two main types available to UK gardeners: round or torpedo-shaped traditional shallots with copper or red skin, and banana shallots, which are longer, milder and considerably easier to peel for cooking. Both are grown identically from sets – small dried bulbs bought specifically for planting rather than eating. Shallots can also be grown from seed, which gives access to a wider range of varieties but takes longer to produce a harvestable crop and is less reliable for UK gardeners working within a single growing season.
Planting shallots
Shallots are planted from sets rather than seed for most UK gardeners. Sets can go in from mid-February in mild areas under cloches, or from March to April without protection once the worst frosts have passed. Earlier planting gives the bulbs more time to establish and multiply before the lengthening days trigger maturity, which tends to produce larger, heavier clusters with more individual bulbs per set. However, sets planted into very cold, wet or compacted soil will rot before they can establish – soil temperature and drainage matter more than calendar date. If the bed is still cold or waterlogged in early March, waiting another two or three weeks costs less than a failed planting.
Push each set into the growing medium so the tip just protrudes above the surface, spacing them 15-20cm apart in rows 30cm apart. In a raised bed the grid approach works well – 15cm spacing in both directions – and still gives good yields because the free-draining, fertile growing medium compensates for the slightly closer planting. Do not bury sets deeply as covering the neck encourages rotting before the set can establish – the tip must be clearly visible. Firm gently around each set but do not compact the soil, which would restrict root development. Birds sometimes pull freshly planted sets from the ground, particularly in the first week before the sets have rooted; covering with fleece or laying a net over the bed prevents this and also provides some protection against late frosts in early February and March plantings.
Set size matters. Large shallot sets tend to bolt and flower rather than multiply, producing a single large bulb with a flower stalk rather than a useful cluster. Medium-sized sets at roughly 2-3cm diameter give the best results. When buying sets, avoid the very largest ones in the bag – they are the most likely to bolt regardless of growing conditions.
Ongoing care
Shallots need very little attention once established. There is no complicated feeding programme, no pollination management and no particular timing pressure during the growing period. The most important things to get right are consistent moisture during the active growing phase and a deliberate, complete stop to watering as the crop approaches harvest – these two habits together make the difference between shallots that store all winter and shallots that rot in the shed by October. Both are simple to manage once the pattern is understood, and both follow from the logic of the crop: the bulbs need water to grow and need dryness to cure.
No feeding is required during the growing season if the growing medium was well prepared before planting. Shallots are not heavy feeders and adding nitrogen fertiliser during the growing period encourages leafy top growth at the expense of the developing bulbs. The growing medium should have been enriched with well-rotted compost at bed preparation time – that is the only input the crop needs.
Shallots work well in the same bed rotation as leeks – both are alliums that occupy the bed for a similar length of time and benefit from the same fertile, well-drained growing conditions. Rotating all alliums – including shallots, onions and garlic – around different beds each year is the single most effective way to prevent the buildup of soilborne diseases that can make a bed unusable for the crop family.
Harvesting and storing
Shallots are ready to harvest when the foliage has yellowed and fallen over naturally – usually from late June through August depending on planting date and variety. Do not rush this; bulbs harvested before the foliage has fully died back will not cure or store as well. The difference between bulbs lifted at the right time and those lifted a week or two too early can be months of storage life. Choose a dry day for lifting – wet soil clings to bulbs and adds significantly to curing time. Ease the whole cluster from the ground with a fork rather than pulling from the foliage, which risks snapping the necks and creating entry points for rot. Handle carefully to avoid bruising or scratching the outer skins. Any bulb with damaged skin should go straight to the kitchen rather than into storage, as broken skin is the starting point for most storage failures.
Common problems
Shallots share the same pest and disease risks as onions and garlic. In practice, most UK growers manage seasons without serious problems provided they rotate the crop and keep the mesh on. The four issues below cover the full range of what to look out for – two are severe when they appear and essentially require accepting the loss of the affected plants, while two are manageable with simple adjustments.
Best varieties
‘Golden Gourmet’ is the most widely available round shallot in UK garden centres – reliable, productive, with good disease resistance and a straightforward growing habit that suits first-time growers well. It stores reliably through winter and multiplies well from medium-sized sets. ‘Zebrune’ is the classic French banana shallot: long, torpedo-shaped and with an exceptionally sweet, complex flavour that deepens considerably in storage and is the type most often found in good delis and restaurants.
All three varieties share the same growing requirements and can be planted at the same time and in the same bed. Mixing round and banana types in a single planting gives different shapes, textures and flavour intensities in the kitchen through winter – worth doing when buying sets if the aim is culinary variety rather than maximum yield from a single type. Round types are the better choice for cooking whole or halving for roasting; banana types peel more easily and are preferable for anything requiring finely sliced or chopped shallot. Saving a few of the best-looking bulbs from your own harvest to replant the following spring reduces the cost of sets over time, though certified sets carry lower disease risk than home-saved ones.
Share on socials: