At a glance
Tulips are among the most rewarding spring bulbs available to UK gardeners, producing bold upright flowers in a colour range and form variety that no other spring bulb can match. From small early-flowering species types opening in March to enormous frilly parrot and double flowers lasting into late May, a well-chosen combination of tulips delivers nine to ten weeks of continuous spring colour. The work involved is modest – a few hours of planting in autumn produces a display that needs no further attention until the flowers appear. Understanding how tulips behave, particularly their relationship with drainage and their need for post-flowering care, is what turns a spectacular but short-lived first-year display into a genuinely perennial planting.
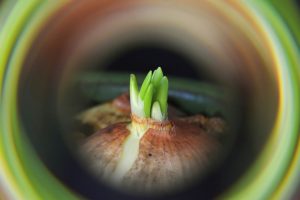
Tulips are geophytes – plants that store energy in underground bulbs and use it to power growth and flowering in spring. Each bulb planted in autumn contains everything needed for one season’s flowers: the embryonic flower, the leaves, and the food reserves. After flowering, the leaves continue to photosynthesise until they die back in early summer, returning energy to the bulb and to the small offset bulblets that form around it during the growing season. This post-flowering period determines how well the bulb will perform the following year. Cutting the leaves back early is the single most reliable way to reduce or eliminate repeat flowering – it is the most common mistake tulip growers make, and understanding its consequences is central to growing tulips well.
Tulip types – what to choose and why
The tulip classification system runs to fifteen divisions, but most UK gardeners need to understand five main groups to make good purchasing decisions. The most important distinction is between tulip types that reliably perennialise in UK conditions and those that are better treated as annual replacements.
Species or botanical tulips are the wild types and their close derivatives. They are small-flowered, extremely hardy and the most reliably perennial of all tulips. Varieties derived from Tulipa kaufmanniana, Tulipa fosteriana and Tulipa greigii flower in March and April, reach 15-25cm and will naturalise and spread in well-drained sunny conditions. They suit rockeries, the front of borders and containers where their small stature can be appreciated, and they require no lifting or storing.
Darwin hybrid tulips produce the large cup-shaped flowers on strong stems 45-60cm tall in April and May that are the classic image of the tulip in full bloom. They are the most reliable of the large-flowered tulips for repeat performance when left in the ground. Varieties in the Apeldoorn series – cherry-red Apeldoorn, golden-yellow Golden Apeldoorn, and others – have been dependable performers in UK gardens for decades and are widely available. Darwin hybrids are the best starting point for any gardener who wants perennial large-flowered tulips without lifting and storing.
Triumph tulips are mid-season varieties with sturdy stems in April, reaching 40-55cm. They are more reliably perennial than many later types and are among the best choices for bedding displays that will repeat without annual lifting. Single late and Darwin tulips (not the hybrid group) flower in May and produce the elegant tall classic shape, reaching 50-70cm, but are less reliably perennial and respond better to lifting and storing.
Parrot tulips, double late, fringed and lily-flowered tulips are the ornamental types with unusual or extravagant flower forms. They flower in May and are spectacular, but are the least reliably perennial in UK conditions. Most gardeners treat them as annuals – planted for a single season’s display and replaced each autumn. Their value is in extraordinary visual impact and late-season colour, not long-term permanence.
When and how to plant
Tulips should be planted later than most other spring bulbs – from late October through to December, and into January in mild years. The reason relates to disease management: tulips planted while the soil is still warm in early autumn can produce enough shoot growth to become vulnerable to tulip fire, the most damaging fungal disease affecting tulips in the UK. Waiting until later in autumn when the soil has cooled, and the risk of warm damp conditions persisting, reduces the chance of this vulnerable young growth being present in the conditions the disease requires. Unlike daffodils and most other spring bulbs, tulips suffer no disadvantage from late planting.
Drainage is the most important factor for tulip growing success. Waterlogged soil causes bulbs to rot before they flower and is the most common single cause of failure. On heavy clay soils, plant in raised beds, large containers, or improve the planting area with generous amounts of horticultural grit worked in to the top 30cm. A south or west-facing position in full sun produces the best results and also helps ripen the bulbs after flowering. Plant at a depth of 15-20cm measured from the base of the bulb to the soil surface – approximately three times the height of the bulb. Place bulbs with the pointed end upward. Spacing can vary from 8cm for a dense bedding effect to 15cm for a more naturalistic look.
Squirrels and mice are a significant problem in many UK gardens. Covering planted areas with chicken wire pegged flat to the soil surface immediately after planting and leaving it until the ground freezes prevents digging. Remove it before shoots emerge in late winter. Alternatively, plant in containers where a layer of wire mesh can be fixed over the compost surface.
Tulips in containers
Container growing suits tulips particularly well. The drainage can be controlled precisely, the management of post-flowering foliage is simpler, and containers can be moved to a less prominent spot once the display ends and the unattractive dying foliage takes over. For gardeners on heavy clay soil, containers offer ideal conditions that would be difficult to replicate in the ground.
Use a mix of two parts multi-purpose compost to one part horticultural grit – free drainage is essential. Ensure the container has adequate drainage holes and is positioned where it will not become waterlogged. Choose containers large enough to allow 10cm of compost beneath the bulbs and at least 10-15cm above them. Large terracotta pots, half-barrels and troughs are more suitable than small containers that limit planting depth and dry out too quickly. Terracotta in particular is porous and improves drainage compared to glazed or plastic containers.
The layering technique – sometimes called the lasagne method – extends the flowering season from a single container. Plant a first layer of late-flowering varieties at the base of the container, add a layer of compost, then plant a layer of mid-season varieties, add more compost, then plant an early-flowering layer near the surface. As the season progresses, each layer comes to prominence in turn, extending the display from a single container across six to eight weeks. Label each layer before adding the next to avoid confusion at replanting time.
Pack bulbs closer in containers than in the ground – 5-7cm spacing produces the dense display that works visually in a pot, where the impact comes from concentration rather than naturalistic drift. After flowering, move the container to a sheltered but open position while the foliage dies back. This replicates the dry summer conditions of the tulip’s native Central Asian habitat and significantly improves repeat performance for the following year.
Aftercare and repeat flowering
The key to reliable repeat flowering is managing the post-flowering period correctly. After the flowers fade, deadhead promptly by removing the spent flower head – leaving it diverts energy to seed production at the expense of the bulb, with no benefit to the gardener. Leave every leaf and stem completely intact. The leaves are photosynthesising and returning energy to the bulb; cutting them back while still green depletes the bulb and is the primary cause of declining performance and failure to repeat flower. Leave all foliage until it has turned fully yellow and pulls away from the bulb cleanly without resistance – typically six to eight weeks after flowering. In a border where dying tulip foliage looks untidy, plant low-growing perennials or annuals nearby to grow up and mask it, rather than cutting the leaves back early.
Feeding after flowering significantly improves repeat performance. As the flowers fade, apply a high-potassium liquid fertiliser every one to two weeks while the foliage is still green. Tomato feed works well and is widely available. Water during dry spells while the foliage is active. This post-flowering feeding and watering period is the one most commonly skipped – and its omission is the second most common reason, after premature leaf removal, for tulips declining in subsequent years. A well-fed bulb stores more energy, produces stronger offsets and is better prepared for the following season than one left entirely to its own resources.
Lifting and storing is the management approach that gives the most control over repeat performance. Once the foliage has completely died back, lift the bulbs carefully, brush off loose soil and allow them to dry in a warm airy place for a few days. Store in paper bags or open mesh trays – not sealed plastic bags, which trap moisture and cause rot – in a cool, dry, well-ventilated space. Label clearly. Before replanting in autumn, check each stored bulb: firm, plump bulbs with intact papery tunics will perform well; soft, lightweight, wrinkled or mouldy bulbs should be discarded.
Darwin hybrid tulips and most species types can be left in the ground through summer in well-drained soils and will reliably repeat flower without lifting. Large-flowered ornamental types – parrot, double late, lily-flowered – are generally better lifted and stored, because the summer moisture in most UK garden soils causes deterioration. If left in the ground, they often produce smaller flowers or fail to flower in subsequent years.
Creating a sequence of flowering
The full tulip season in the UK runs from early March to late May – nearly three months. Most gardeners plant only one or two groups, creating a two to three week display rather than the extended season that deliberate variety selection makes possible. Planning across at least three flowering periods before buying converts the same budget into a display that runs for eight weeks rather than two.
Species and Kaufmanniana types open first in March, with small flowers at 15-20cm effective in rockeries, the front of borders and containers. They are among the most reliably perennial tulips available and once established will spread slowly to fill a position over several years without any lifting or storing. Single early and double early tulips follow in late March and April at 25-40cm, providing reliable colour and good cut flowers. Triumph tulips and Darwin hybrids dominate April and early May at 40-70cm, delivering the classic tulip display at its most impactful. The season ends with parrot, double late and lily-flowered varieties in May, lasting into early June in a good year – these are the most dramatic and extravagant forms and make the best possible cut flowers at their peak.
Mixing groups from at least three different flowering periods produces a rolling sequence rather than a simultaneous one. Plant each variety in its own dedicated block or drift rather than mixing different types together – a block of 20 plants of the same variety flowering simultaneously makes far more visual impact than 20 individual plants from 20 different varieties scattered through a bed. The colour and form reading of a drift of Apeldoorn in full flower, or a mass of Black Parrot tulips in late May, is what makes tulips one of the most powerful spring garden plants. Consider combining different heights within the same colour palette – species types at the front, Triumphs in the middle, Darwin hybrids at the back – to create a layered border that reads coherently as a whole rather than a collection of unrelated rows.
Common problems
Tulip fire, caused by the fungus Botrytis tulipae, is the most serious disease affecting tulips in UK gardens. It appears as brown scorched-looking patches on leaves and stems, often with grey fluffy mould at the base of shoots in damp conditions. It spreads rapidly and can destroy an entire planting within days in wet spring weather. Remove all affected material immediately and bin it – never compost it. Lift bulbs once the foliage dies back and destroy any showing dark lesions or soft spots. Do not plant tulips in the same location for at least two to three years after an outbreak. The disease can persist as dormant sclerotia in the soil, so growing tulips in containers with fresh compost, or moving the planting location entirely, is the most reliable way to break the cycle.
Virus diseases can cause colour-breaking in tulip flowers – streaked or feathered patterns in the petals that differ from the variety’s normal appearance. While some of these effects were historically prized and cultivated (the famous Dutch “broken” tulips of the 17th century were caused by the Tulip Breaking Virus), infected plants should be removed and destroyed in modern plantings as the virus is spread by aphids and will gradually infect other tulips and lilies. Aphid control during the growing season reduces the risk of virus spread, though complete prevention is not possible in a typical garden setting.
Grey bulb rot, caused by Rhizoctonia tuliparum, produces a dry grey rot at the base of the bulb and causes complete failure to emerge. Unlike tulip fire, it does not produce the characteristic scorched leaf appearance above ground – the first sign is typically the absence of shoots where bulbs were planted. Affected bulbs show grey powdery decay when lifted. The same advice applies: remove all affected material, do not plant tulips in the same spot for several years, and start fresh with clean bulbs from a reputable supplier. Growing in containers with fresh compost each year eliminates both tulip fire and grey bulb rot as recurring problems, since neither pathogen is present in new compost.
The common thread through almost every tulip problem is soil quality and management: too wet causes rot, too compacted limits drainage, post-flowering neglect depletes the bulb, and contaminated soil transmits disease from season to season. Good drainage, appropriate planting depth, full aftercare and rotation of planting positions address the vast majority of difficulties before they arise. Tulips that are grown well in the right conditions are remarkably straightforward plants – it is only when one or more of these basic requirements is missing that the problems begin, and in virtually every case the solution is cultural rather than chemical. Get the drainage right, plant late, leave the foliage alone after flowering, and feed while the leaves are green – that cycle, repeated consistently, is the entire foundation of growing tulips well year after year.
Share on socials: