At a glance
Garlic is one of the most rewarding crops to grow in pots precisely because it asks so little. Plant cloves in autumn, leave them largely alone through winter, give them a little water and feed in spring, and by July you will be lifting proper bulbs of home-grown garlic that taste entirely different from the papery supermarket variety. A single well-managed 40cm pot can produce eight to ten excellent bulbs with minimal effort and almost no active intervention through the coldest months.
The key differences between growing garlic in pots versus in the ground are pot depth, compost choice and watering management in spring. Get those three things right and container garlic is genuinely easy – arguably easier than most other edibles because it demands so little attention through the winter when the weather is worst. This guide covers every stage from variety selection through to curing your harvest.
Best varieties for pot growing
Garlic divides into two main types: softneck and hardneck. Softneck varieties have a longer shelf life and milder flavour, perform well across most UK regions and are the better choice for container growing in exposed or cooler positions. Hardneck varieties offer stronger, more complex flavour, produce edible flower stalks called scapes in late spring, and have better cold tolerance – but shorter shelf life and generally need slightly deeper containers. Both types grow well in pots when the conditions are right.
Always buy certified garlic seed from a reputable UK supplier, never supermarket garlic. Supermarket garlic may be treated to inhibit sprouting, may not be suited to UK growing conditions and can carry disease. UK-grown certified seed garlic costs a few pounds more but produces dramatically better results. The Isle of Wight Garlic Farm and most good garden centres stock excellent UK-suited varieties.
Choosing the right container
Pot depth matters more than diameter for garlic. The plant needs room to develop its root system and expand its bulb beneath the compost surface. Shallow containers produce small, poorly formed bulbs regardless of how well everything else is managed – this is the single most common reason container garlic disappoints. A 25cm depth is the practical minimum, but anything over 30cm produces noticeably larger, better-formed bulbs and is worth the extra investment in a larger container.
Material matters too. Terracotta is the best choice for garlic because it is porous – it breathes, wicks away excess moisture and prevents the root zone becoming waterlogged in wet UK winters. Plastic pots retain moisture longer which can be a genuine problem from November to February when garlic roots are prone to rot in saturated compost. If you only have plastic containers, compensate by ensuring multiple drainage holes in the base and raising the pot on feet so water can escape freely.
Planting correctly
Autumn planting is strongly preferred for UK container garlic. The cloves need a period of cold (called vernalisation) to develop properly formed multi-clove bulbs rather than single undivided rounds. The UK winter provides this naturally when cloves are planted in October or November. Spring-planted garlic frequently disappoints in containers because the cold period is abbreviated or absent, resulting in rounds rather than bulbs.
Plant in October or November
Autumn planting gives the cloves the cold vernalisation period they need. Cloves planted in spring frequently fail to divide and produce only single round bulbs. If you miss autumn, plant as early in the new year as possible – February planting still produces reasonable results in mild years.
Fill with free-draining compost
Mix multipurpose compost with 20 to 30% horticultural grit or perlite. Pure multipurpose holds too much moisture for winter garlic and significantly increases rot risk. The grit improves drainage without reducing fertility and keeps the compost open and workable through multiple freeze-thaw cycles.
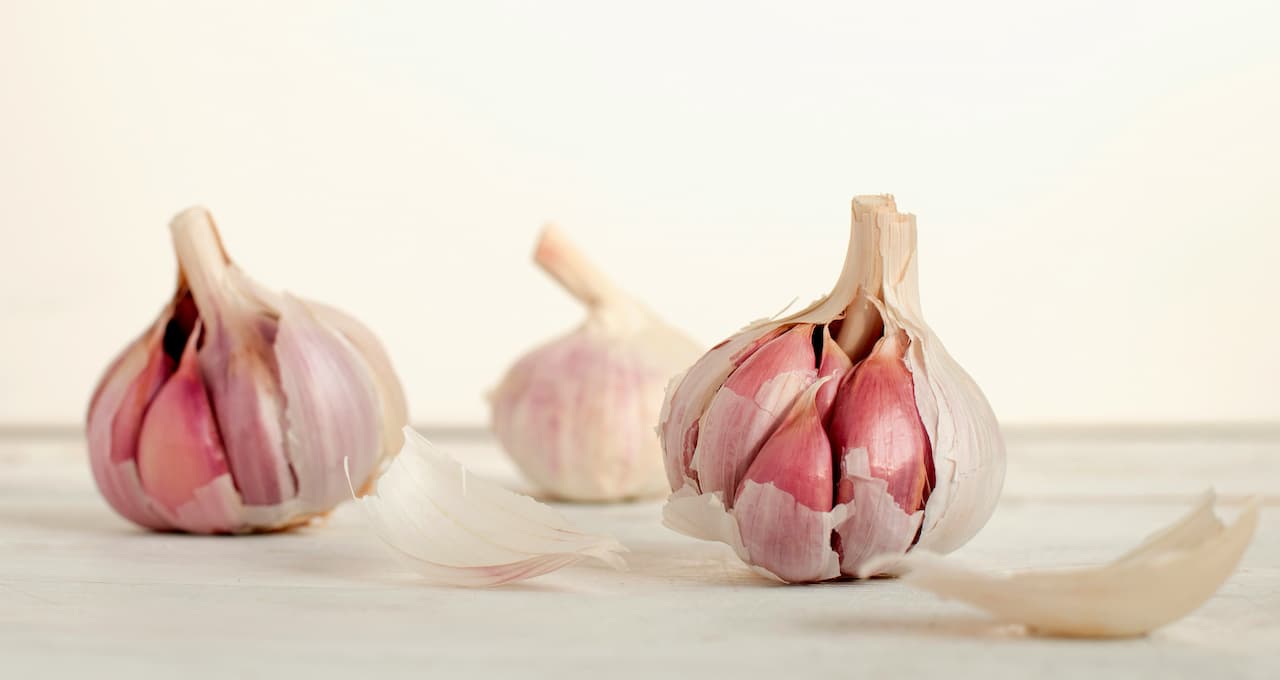
Separate into individual cloves and select the largest
Break the purchased bulb into individual cloves. Plant only the largest, most plump cloves – these produce the best bulbs. Small cloves produce small bulbs regardless of conditions. Save the smaller cloves for cooking immediately rather than wasting pot space on them.
Plant pointed end up, 10cm apart, 5cm deep
The pointed tip is the growing end. Plant at exactly 5cm depth – too shallow and the clove is vulnerable to frost heave; too deep and emergence is slow and the bulb is cramped. Space at 10cm in all directions. A 30cm pot will hold 6 to 8 cloves comfortably at this spacing.
Position in a sheltered, sunny spot
Garlic needs good light and reasonable shelter from the worst winter weather. A south or west-facing wall or fence provides ideal conditions. Move pots to maximum sunlight in spring when bulb development accelerates – this matters significantly from March onward.
Care through the season
Container garlic divides cleanly into two phases: a dormant winter phase that requires almost no intervention, and an active spring phase where watering and feeding make a significant difference to final bulb size. The distinction between phases is important – over-watering through winter is the most common cause of rot, while under-feeding through spring is the most common reason for disappointingly small bulbs.
Common problems and fixes
Container garlic is relatively problem-free when drainage is good and rotation is maintained. The majority of failures come down to waterlogging in winter, planting too late, or growing the same alliums in the same compost two years running. The table below covers every common issue with the diagnosis and fix.
Never plant garlic in the same pot or compost two years running. Allium white rot and other soil-borne diseases build up quickly if garlic is grown repeatedly in the same compost. Always use fresh compost each season for container garlic, and never follow garlic with onions, leeks or chives in the same pot without a complete compost change in between.
Harvesting and curing
Garlic in pots is ready to harvest when the lower leaves have yellowed and died back but two or three green leaves remain at the top – typically June to July for autumn-planted garlic. Do not wait until all leaves are dead. Once the outer leaves have fully collapsed, the papery wrappers of the bulb begin to deteriorate and the cloves are more likely to separate and store less well.
Tip the pot out gently onto a surface rather than pulling individual bulbs from the compost – this protects the wrapper and avoids bruising. Brush off excess compost and lay the bulbs in a warm, airy place to cure for three to four weeks. A garden shed in summer, a sunny windowsill, or a spot under cover outside with good airflow all work well. The outer skins will dry and become papery during curing and the bulbs will store for months at room temperature in a cool, dry kitchen. Home-grown garlic cured properly tastes dramatically different from supermarket varieties – stronger, more complex and worth every bit of the wait.
Share on socials: