At a glance
Spring is the season that determines how a lawn performs for the rest of the year. Every task done between February and May – or left undone – shows in the lawn by June and stays visible through to autumn. A lawn that receives a structured spring programme will be denser, greener and more resilient to summer drought and wear than one left to recover from winter on its own. The difference between a properly managed spring lawn and a neglected one is not marginal – by the end of May they look like different lawns.
The most important principle in any spring programme is sequence. The order in which tasks are done matters as much as the tasks themselves. Every step creates the conditions that make the next step effective. Running them out of order either wastes the preceding effort or actively undermines what follows. This guide works through the why as well as the what – understanding why the sequence works makes it much easier to apply it correctly in real conditions, where the weather does not always cooperate with the ideal dates.
Understanding thatch, compaction and moss
Thatch is the layer of dead grass stems, roots and organic debris that accumulates at the base of the turf between the living grass and the soil surface. Every lawn builds thatch naturally. The question is not whether it exists but whether it has built up past the point where it becomes a problem.
A thin thatch layer of a few millimetres is actually beneficial. It helps retain moisture at the soil surface, protects the crown of the grass plants from drying out, and provides a small buffer against compaction. This is why the goal of scarifying is to reduce the layer to a manageable depth, not to remove every trace of organic material. Problems begin when thatch exceeds about a centimetre. At that depth it starts acting as a physical barrier – water applied to the surface is absorbed by the thatch layer rather than draining through to the roots, fertiliser sits on top of the organic material rather than reaching the soil, and the thatch layer stays permanently damp, creating ideal conditions for moss, fungal disease and shallow rooting. Grass grown in a heavily thatched lawn roots into the thatch rather than into the soil, making it extremely vulnerable to drought because the thatch dries out far faster than soil does.
You can check thatch depth by pulling back a small section of turf and looking at the pale brown layer between the visible roots and the soil surface. If it is spongy and more than about a centimetre thick, it needs removing. If the lawn feels noticeably bouncy underfoot when you walk on it, that is the thatch layer compressing and releasing under your weight.
Soil compaction is the reduction of air-filled pore spaces between soil particles. In healthy uncompacted soil, roughly half the volume consists of these spaces, which hold air and water and give roots room to grow. When compaction reduces this porosity, water cannot drain freely, oxygen levels in the soil drop, and root penetration becomes limited. UK lawns compact through freeze-thaw cycles over winter and through foot traffic – particularly in wet conditions when the ground has little structural strength. Clay soils compact more severely and recover more slowly than sandy soils, which is why lawns on heavy clay often need hollow-tine rather than solid-tine aeration. You can test compaction by pushing a screwdriver or spike into the lawn – in healthy soil it should reach 10cm without much resistance. Stopping at 2 or 3cm indicates compaction that is actively limiting root growth.
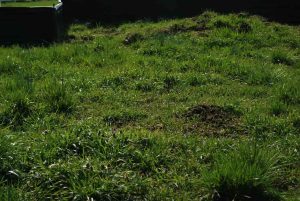
Moss in a lawn is a symptom, not a cause. It colonises space that grass has vacated because conditions have shifted in moss’s favour – shade, poor drainage, compaction, low fertility and thick thatch are the usual causes, often in combination. Killing moss without addressing these conditions produces a temporary improvement that reverses within a season. Iron sulphate kills existing moss through a contact chemical reaction that blackens the tissue within days. The dead moss must then be removed by scarifying. Applying moss killer four to six weeks before scarifying ensures the moss is thoroughly dead and ready to rake out cleanly – scarifying live moss distributes viable fragments across the lawn.
Why the order of tasks matters
The spring sequence is not arbitrary. Each task creates the conditions that make the next task effective, and running them out of order either wastes the preceding effort or actively works against what follows.
Soil temperature and when to start
Soil temperature is the governing factor for the entire spring programme, not calendar date. Grass begins meaningful active growth when soil temperature at a depth of 5 centimetres reaches around 7 degrees Celsius. Below this, the grass is not growing fast enough to respond to treatment. Roots cannot take up nutrients effectively even if fertiliser is applied. Scarifying into cold turf stresses it without the growth conditions needed to recover quickly. Above 10 degrees, growth is strong enough to make all spring treatments fully effective.
The problem with calendar dates is that UK soil temperatures vary enormously. Clay soils warm significantly more slowly than sandy soils in spring – clay has a higher specific heat capacity and retains winter cold longer. A north-facing garden on heavy clay in Yorkshire may not reach 7 degrees until late April in a cold year. A south-facing garden on sandy soil in Hampshire may reach it in late February in a mild year. As a general guide, midlands and southern England typically reach suitable temperatures in mid to late March in an average year; Scotland and northern England in mid to late April. But these are averages – warm springs push dates earlier, cold springs later.
The most reliable practical indicator is the grass itself. When the lawn is visibly growing, producing new growth that needs cutting weekly, soil temperature is adequate. When the grass is sitting still and pale, looking almost the same week to week, it is not ready. A soil thermometer pushed 5 centimetres into the ground gives a direct reading, but the visual cue is reliable enough for most situations. Trust the lawn, not the calendar.
Month-by-month programme
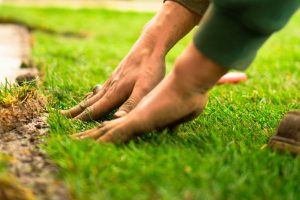
The lawn will look worse before it looks better after scarifying. The torn, thin, patchy appearance is correct – the material removed was blocking the root zone from functioning properly. Do not panic and intervene. Overseed, feed and water as needed, then leave the lawn alone to grow. Recovery takes three to four weeks. Intervening repeatedly during this window – extra watering, extra seed, extra feed – does not speed recovery and can compact the already-disturbed surface.
Solid-tine vs hollow-tine aeration
Not all aeration is the same. The choice between solid-tine and hollow-tine matters for compacted lawns, and the difference is significant enough that choosing the wrong type wastes the effort involved.
After hollow-tine aeration the plugs of soil left on the surface can be swept up and removed, or left to dry and then broken up by brushing. Brushing topdressing – a mix of sharp sand and compost – into hollow-tine holes after aeration gradually improves the soil structure around the root zone over several seasons of treatment. This is particularly effective on heavy clay lawns where the sand fraction in the backfilled holes begins to change the drainage characteristics of the surrounding soil over time.
Common mistakes
Working on waterlogged or soft ground is the most consistently damaging spring mistake. When soil is saturated its structural strength is close to zero. Any weight applied compacts rather than passes through. Mowing a wet lawn leaves visible tracks representing compaction channels through the sward. Running a scarifier or aerator on wet ground creates surface damage without achieving the intended result – tines push material sideways rather than pulling out thatch cleanly. If the ground gives underfoot, wait. Waiting costs a few days. Working on wet ground creates compaction that takes the rest of the season to address.
Treating moss without addressing its cause is an annual exercise that produces the same result every spring. Iron sulphate kills existing moss effectively but it returns within a season if the conditions favouring it have not changed. Shade, poor drainage, compaction and low fertility all create moss-friendly conditions. These can be addressed progressively: drainage through annual hollow-tine aeration and topdressing with sharp sand, fertility through a correct feeding programme, compaction through regular aeration, thatch through annual scarifying. None of these is a single-season fix, but each year of correct treatment shifts the balance a little further in the grass’s favour.
Reading the recovery and the long view
A well-managed spring programme produces a predictable recovery arc. After scarifying the lawn looks worse for ten to fourteen days. After feeding it greens up visibly within a week of the first post-feed mow. Overseeded patches show a green haze of germinating shoots within two to three weeks of April sowing. By mid-May the cumulative effect should be clearly visible: a denser and more uniform sward, fewer bare patches, stronger colour, and a lawn that feels firm underfoot rather than spongy with unaddressed thatch.
If the lawn is still thin and pale in mid-May despite correct treatment, there are three likely causes. Soil that was still too cold when treatment was applied – if scarifying and feeding happened during a cold snap, the grass simply did not have the warmth needed to respond, and the effective start of the programme was later than planned. A drainage problem that hollow-tine aeration and gradual topdressing with sharp sand will address over several seasons but not in a single treatment. Or shade – deep shade under trees or alongside structures will always produce a slower recovery and may require a shade-tolerant seed mix, a higher cutting height, or an honest reassessment of whether grass is the right choice for that area.
The spring programme is not a one-time fix. It is an annual baseline. A lawn maintained on this programme year after year accumulates the benefits: reduced thatch because annual scarifying removes it before it compacts further, improved soil structure from regular aeration, denser turf from consistent overseeding that crowds out weeds and moss, and better root depth from correct and consistent fertilising. Three years of correct spring management produces a lawn that needs progressively less intervention because the underlying soil structure has genuinely improved rather than just been treated at the surface each time.
The complementary autumn programme – scarifying, aerating and overseeding in September when the soil is still warm from summer – reinforces the spring work significantly. Autumn overseeding germinates into warm soil with months of gentle growth ahead before winter, producing denser turf by the following spring than April overseeding alone achieves. If only one renovation season is possible, the choice depends on the lawn’s condition: a lawn damaged by winter needs spring treatment to recover. A lawn that came through winter in reasonable shape but thinned over summer from drought and heavy wear is better served by autumn renovation.
Share on socials: