At a glance
If you build a hotbed in January and do it right, you can be eating salad from your allotment plot in March. Not from a bag. Not from a windowsill. From the actual ground, in a season when most people have not picked up a trowel yet. The Victorians grew melons and cucumbers through winter using nothing but fresh horse manure and a cold frame, and while I have no great ambitions toward Victorian melons, the same principle on a smaller scale is one of the most satisfying things you can do at the start of a new growing year.
The idea is simple. Fresh horse manure generates serious heat as it decomposes. Place a cold frame over a thick layer of it and you create a growing environment that is warm enough for germination regardless of what the weather outside is doing. No electricity. No heating cables. A waste product from the nearest stable and whatever you have available for a frame. It extends your season by six to eight weeks at the front end, and the spent manure after two to three months becomes some of the best compost you will put on your beds. There is no waste in the system at any stage. Two things trip people up. One is using manure that is too old or too dry to generate useful heat. The other is planting into the hotbed before the initial temperature spike has dropped to a safe range. Get both of those right and the rest is straightforward.
How it works
A hotbed is a cold frame placed over a thick layer of fresh horse manure. As aerobic microorganisms break down the organic material in the manure, they release heat as a byproduct. That heat rises into the growing medium above and from there into the air inside the frame. On top of that, the frame captures whatever solar gain is available during the day and holds it overnight. The result is a growing environment that stays meaningfully warmer than ambient. On cold nights this is often 10 to 15 degrees above outside temperature, with no power source required.
A cold frame on its own adds a few degrees above ambient, which is enough to protect plants from frost but not enough to germinate seeds reliably in January or February. The hotbed changes this because the heat source is internal and independent of the sun. On a grey, dull February day when the sky is doing nothing useful, the manure below is still generating heat regardless. If you have access to a greenhouse or polytunnel, building the hotbed inside it is even better: you get wind protection, better overnight temperature retention, and you do not need to worry about the cold frame lid. The hotbed works on the same principle either way. The outer structure just changes.
The core of a fresh hotbed pile can reach 50 to 70 degrees Celsius within a few days of building. That is far too hot to plant into. Seeds cook, roots burn, ammonia off-gassing at peak fermentation scorches seedlings even if the temperature alone would not. You cannot skip the waiting period. The art of managing a hotbed is largely the art of knowing when the heat has dropped to the right range.
The manure question
Horse manure is the right material. Not one option among several. The right material. If you build a hotbed with anything other than horse manure or stable litter, you will most likely end up with a cold bed and a wasted afternoon.
What you will actually collect from a stable is stable litter: the mix of manure, urine-soaked straw and bedding that horses produce daily. This is better than pure manure for a hotbed. The urine adds nitrogen that drives decomposition and heat generation. The straw adds carbon and the physical structure that prevents the pile from compacting solid, which would cut off the oxygen the aerobic bacteria need. Most stables are glad to give it away because it is a disposal problem for them. Call ahead, bring your own bags or a trailer, and most will let you take as much as you want. Gumtree and local Facebook equestrian groups are useful if you do not know any stables nearby.
One thing that affects heat generation is whether the stable uses straw or wood shavings as bedding. Straw has a better carbon-to-nitrogen ratio for decomposition than wood shavings, so straw-bedded stable litter heats faster and more reliably. Shavings-based litter still works but takes longer to get going. Avoid pine shavings specifically, which can create conditions that inhibit the aerobic bacteria you need.
Fresh is non-negotiable. You want material that still smells distinctly like a stable: active, steaming slightly on a cold morning. Manure more than six to eight weeks old has already lost most of its heating potential as the initial microbial activity winds down. Brown, crumbly and earthy smelling material is already composted. Put it on your beds, absolutely, but do not build a hotbed with it. There is no heat left to give.
The squeeze test before you accept any batch: grab a fistful and squeeze it hard. Falls apart when you open your hand = too dry, needs water adding. Water runs out between your fingers = too wet, will go anaerobic rather than hot. Holds its shape when you open your hand but crumbles easily into smaller pieces = correct moisture for aerobic decomposition and heat.
Aminopyralid: the UK-specific risk
Before you accept any horse manure, read this section. Aminopyralid is a persistent broadleaf herbicide used very widely on UK grassland to control thistles, docks and ragwort. Horses eat sprayed grass or hay made from sprayed grass, the herbicide passes through the animal unchanged, and it ends up in the manure you have just been given for free. The problem is that aminopyralid survives composting. It can persist in soil for 12 to 24 months. It is active against broadleaved plants at very low concentrations.
Susceptible crops include tomatoes, potatoes, peas, beans, lettuce, carrots and parsnips. That is most of what you are likely to be starting in a hotbed. Brassicas and sweetcorn are largely unaffected. Symptoms: distorted, cupped, fern-like leaves with narrow twisted growing tips, pale colour, stunted growth. It looks like hormone weedkiller damage because it is hormone weedkiller damage. If you see this in seedlings started in the hotbed, the manure was contaminated.
There is no treatment for aminopyralid-contaminated growing medium. The only fix is removing all affected material and starting again with clean manure. A contaminated hotbed is not recoverable mid-season. Prevention is the only meaningful option.
Before accepting manure from any stable, ask two questions. First: do the horses graze on or get fed hay from land treated with aminopyralid-containing products? Products include Forefront T, Garlon, Milestone and Pastor. The labels require that manure from treated livestock not be used on vegetable plots. Second: is the hay bought in from elsewhere? A stable owner who has never sprayed their own land may still be feeding hay grown on treated land without knowing it. This is a common route to contamination.
If you are unsure, run a bioassay before using the manure. Mix the suspect material 50/50 with compost, pot up some broad bean or tomato seeds in the mixture, and grow them alongside a control pot of known clean compost for three to four weeks. Cupped, distorted, twisted growth in the manure pot confirms contamination. Corteva, who manufacture the herbicide, will supply a free bioassay test kit on request and operate a helpline at 0800 689 8899. If contamination is confirmed, they will arrange removal of the affected material.
How much manure and what size
Depth determines heat output and duration, and there is a real minimum below which the system does not work. At 45 centimetres you will get four to six weeks of useful heat. At 60 centimetres, the useful heating period extends to six to eight weeks and overnight temperature retention is significantly better. Less than 45 centimetres produces weak, short-lived heat that barely justifies the effort of building the thing.
Width and length should match your cold frame, sized so the frame sits flat on top with as little gap at the edges as possible. Heat escapes fastest from the sides. A taller pile loses heat more slowly than a wide, shallow one of the same volume, for the same reason a tall mug of tea stays warm longer than a shallow bowl. For a standard cold frame of roughly 120 by 60 centimetres at 60 centimetres depth, you need somewhere between 250 and 350 litres of stable litter. Allow extra because of the settling.
Site, structure and build
Position matters more than most guides admit. South-facing is the right orientation. Not because the manure needs sun, but because every degree of solar gain inside the frame during the day adds to the warmth at night. A south-facing wall or fence behind the hotbed adds significantly to overnight temperature retention as the thermal mass radiates back. Sheltered from prevailing wind is equally important: wind strips heat from the pile sides faster than almost anything else. Find the most sheltered south-facing spot you have, even if that means the hotbed is not where you had planned to put it.
One optional step worth doing if you have the time and space: pre-heat the pile for ten days before building. Stack the manure in a heap outside, turn it once after three or four days to put the outer material into the centre, then use it for the hotbed once it has had its first violent spike and begun to settle. The initial heat under the frame is then more moderate and you often reach the planting temperature range faster. Not essential but useful.
Fill the manure in layers of roughly 15 centimetres, firming each layer as you go. The firmness should be like a firm handshake: enough that the pile is stable without air pockets, not so dense that all the air has gone. Aerobic decomposition needs oxygen. If the manure feels dry as you fill, add water between layers. It is much easier to get the moisture right during filling than to rehydrate an assembled pile later.
Spread 10 to 15 centimetres of good compost on top of the manure as the growing medium. Not garden soil: too cold, too heavy, and poor for germination. General-purpose peat-free compost or your own homemade material works well. This is where seeds germinate. Roots reach down into the warming manure below as they develop. Top this layer up as the pile settles.
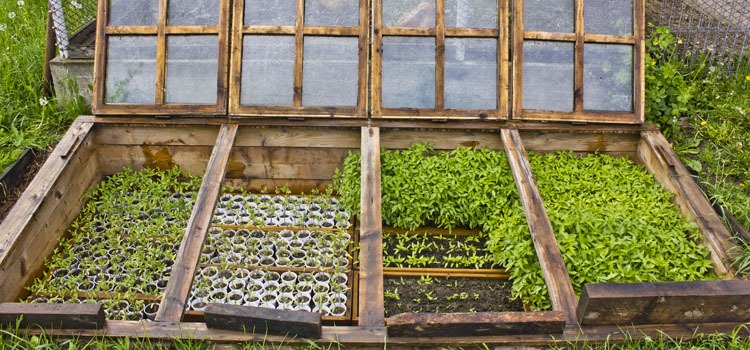
Fit the cold frame on top. Seal any gaps around the edges with straw, folded cardboard, or strips of fleece. Every draught you eliminate is heat you keep. The lid should slope toward the midday sun. If you do not have a cold frame, old wooden window frames in a box of timber, or polythene over a hoop frame, both work. The sophistication is in the manure management, not the frame.
The temperature spike and the wait
Build the hotbed, fit the frame, and do not touch it for at least ten days. The initial fermentation spike within a new hotbed pile is violent by any gardening standard. Core temperatures can reach 60 to 70 degrees Celsius within three to five days. At the same time, the manure is off-gassing ammonia at its peak rate. Either of these alone is enough to kill seeds and scorch seedling roots. Together they are catastrophic. Planting into a hotbed before the spike has passed is one of the more reliable ways to lose everything you sow and feel foolish about it.
Monitor the temperature in the growing medium with a soil thermometer. Push it 10 to 15 centimetres into the compost layer, not into the manure below. Read it morning and evening.
In typical UK winter conditions, a January or February build reaches the planting window in 10 to 14 days. In a cold snap it can stretch to three weeks. In mild conditions it might be as quick as a week. The calendar is a rough guide. The thermometer is the only reliable one.
The pile settles by 30 to 40 per cent in the first fortnight and the growing medium layer drops with it. Keep an eye on this and top up with compost as needed to maintain a consistent 10 to 15 centimetres above the manure. Direct contact between roots and fresh manure causes root scorch even after the initial spike has passed.
What to grow and when
The hotbed goes through two distinct phases and the right crops for each are different. The distinction that matters most: salad crops go directly into the growing medium. Tender heat-loving crops like tomatoes, peppers and aubergines go into seed trays or modules placed on the growing medium surface, not planted directly into it. Their roots reach the decomposing manure below as they develop, providing excellent nutrition at the right stage. But they are better started in modules and potted on as they grow, rather than planted in place.
Cut-and-come-again salad varieties give the most return from the hot phase. Sow once, cut leaves two centimetres above the base and they regrow for weeks. A hotbed built in early January can produce salad leaves by mid-February. That is the first fresh food from the plot after months of nothing.
Day-to-day management
Ventilation. Every sunny day without exception. Even in January, even in February, a cold frame in direct sun heats up faster than you would believe. An unventilated frame in full sun reaches 35 to 40 degrees Celsius within an hour on a bright morning, which is hot enough to wilt and kill seedlings. The rule: if outside temperature is above 8 to 10 degrees and there is sunshine, crack the lid open. Open it further as the day warms. Close it before sunset. Forgetting to ventilate on one unexpectedly sunny morning has killed more hotbed seedlings than bad manure has. If you cannot be at the allotment every day, an automatic vent opener is worth every penny. These wax-cylinder devices push the lid open as temperature rises, need no electricity or batteries, cost around 15 to 20 pounds and last for years.
Watering. The growing medium dries out faster than outdoor beds because of the warmth below. Check it daily once seedlings are up: stick a finger 2 to 3 centimetres in and if it feels dry at that depth, water. Water gently in the morning only, so the surface and stems dry before dark. Wet stems and stale humid air overnight are the conditions that cause damping off. Water around the plants rather than over them wherever possible.
Night insulation on cold snaps. On nights forecast below minus 2 or minus 3 degrees, lay an old carpet offcut, thick bubble wrap, or a folded fleece blanket over the glass lid before dark. An uninsulated glass lid lets heat out fast on a clear cold night. Remove it as soon as light returns to let solar gain back in.
Condensation. Wipe the inside of the lid daily or at least whenever you open it. Drips of condensation falling onto seedling crowns at soil level is a reliable route to damping off. If condensation is heavy and persistent, you are not ventilating enough during the day. The two problems have the same root cause.
Growing medium top-up. As the pile settles, keep the compost layer at 10 to 15 centimetres. When you can see the manure below the compost, add more. This is a weekly check in the first month, not a one-time job.
After the heat fades
Two to three months from building, the active heat is gone. The manure has done its job and is now essentially finished compost: rich, well-rotted and full of nutrition. Plant courgettes, squash or cucumbers directly into the spent manure layer. These are hungry crops that gorge on the nutrient density in decomposed horse manure and they will produce abundantly through summer and into autumn. Two courgette plants will fill a standard hotbed footprint and produce more courgettes than any sensible household can eat. Remove the frame lid entirely at this point or move it elsewhere for other use.
When the summer crops are done in October or November, lift them out and spread the remaining manure across your beds. It will be thoroughly decomposed by then, crumbly and dark, functioning as premium soil conditioner for next year’s growing. A hotbed built in January is still contributing to your plot’s fertility in November. That is the full cycle: early salads from February, a propagation platform for tender crops, summer courgettes through until October, and finished compost spread across the beds at the end. No waste at any stage.
Problems and fixes
Share on socials: