At a glance
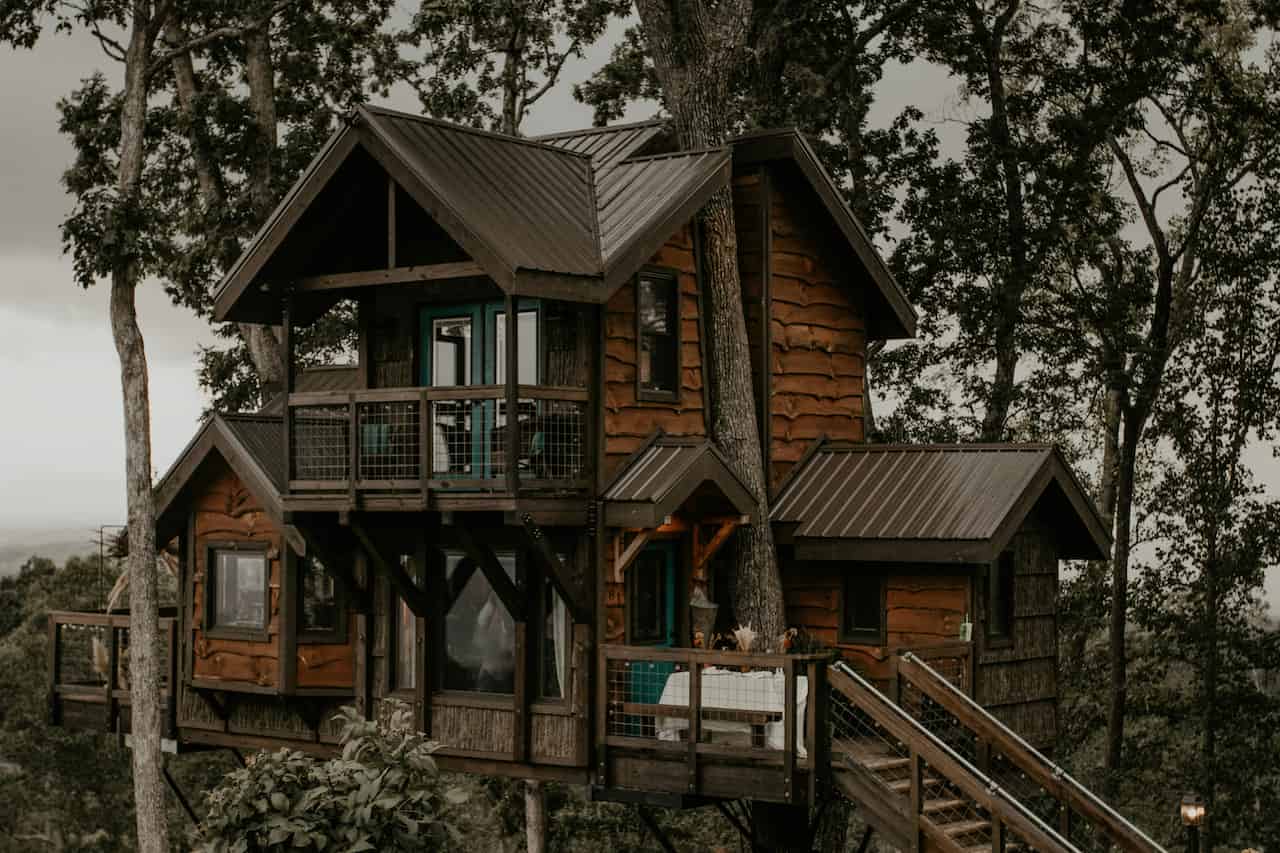
A well-built treehouse is one of the most enduring garden projects a UK homeowner can take on – used heavily in childhood, retained fondly in adulthood and capable of lasting decades with proper construction and occasional maintenance. It is not a weekend project for beginners, but an experienced DIYer with solid carpentry skills, the right tools and a suitable tree can produce a genuinely impressive result that adds real value to family life in the garden.
The key to success is thorough planning before a single screw is driven. The tree, the design, the fixings and the load calculations all need to be thought through before construction begins. Rushing the planning stage produces a structure that is either unsafe, damages the tree or needs to be dismantled and rebuilt – a frustrating and expensive outcome. This guide covers everything you need to plan and build a safe, durable treehouse in a UK garden.
Planning and permissions
In most cases a domestic treehouse does not require planning permission in the UK. Under permitted development rights, garden structures are generally allowed provided they are not forward of the principal elevation of the house, do not exceed 2.5m in height within 2m of a boundary, and cover less than 50% of the garden area. A treehouse used purely as a play structure for children is unlikely to trigger any planning requirement under normal circumstances.
The exceptions are properties in conservation areas, listed buildings, Areas of Outstanding Natural Beauty or where previous permitted development rights have been removed by a condition on the original planning consent. In Scotland and Wales, permitted development rules differ from those in England – always check with the relevant local authority if your property is outside England. If in doubt anywhere in the UK, a quick call to your local planning authority’s duty officer costs nothing and gives a definitive answer before you invest time and money in a project that might need to come down.
Check the tree is yours and not protected. Before any work begins, confirm the tree is within your property boundary and check whether it has a Tree Preservation Order (TPO) on it. A TPO means you cannot carry out any work – including fixing supports – without consent from your local planning authority. Council websites have TPO registers searchable by address. You can also search the Tree Preservation Order guidance on GOV.UK for information on the process.
What you’ll need
Choosing the right tree
The most important decision in the whole project is selecting the right tree. Not every garden tree is suitable – the species, trunk diameter, overall health and position all need to be right before any design work begins. A tree that looks solid can have hidden decay, poor root structure or disease that makes it unsuitable for carrying the loads a treehouse imposes. When in doubt about a tree’s health or structural condition, have it assessed by a qualified arborist before committing to a build.
The minimum trunk diameter for a single-tree treehouse is 30cm measured at the point where the supports will attach. Below this the tree lacks the structural mass to support the fixings and the load without risk of damage or failure. For a platform spanning two trees, 20cm diameter at the fixing point is workable provided both trees are healthy and the span is kept modest. Have any tree with doubtful health assessed by a qualified arborist before the build – the assessment cost is minor compared to the overall project and is essential due diligence for a structure children will use.
Design and materials
A simple, safe treehouse design is a rectangular platform with a railing or solid side walls, a simple roof and a ladder or staircase for access. Resist the temptation to over-engineer with multiple levels, rope bridges and slides at the design stage – a solid basic structure can always be expanded, but a complicated first build is harder to get right. A practical platform size for a children’s play treehouse is 1.5m x 2m to 2m x 2.5m, which is large enough to play in comfortably and small enough to build and maintain safely without an overly complex frame.
Use pressure-treated structural timber throughout for any components that will be exposed to the elements. C24 grade treated timber for the main structural members – joists and beams – and exterior-grade plywood for the floor decking and cladding. All fixings must be hot-dipped galvanised or stainless steel. Ordinary zinc-plated screws and bolts corrode in outdoor conditions, and structural fixings must not be compromised by rust over the years the treehouse will be in use. Budget an additional 15-20% on materials for waste, off-cuts and fixings – structural builds always use more than initial estimates suggest, and running out of the right screw mid-build is a frustrating and avoidable delay.
Use treehouse attachment bolts (TABs) for all main beam connections to the tree. TABs are specifically designed for fixing timber beams to living trees without causing the ring-barking damage that encircling straps or lashing cause over time. A single TAB driven correctly into the tree supports significant loads and the tree grows around it naturally. They are widely available online and represent the correct method for permanent timber-to-tree connections.
Building the platform
The platform is the foundation of the treehouse and must be level, solid and securely fixed to the tree before any further work proceeds. Install the treehouse attachment bolts at the correct height, then hang the main support beam from the bolts using the bolt flanges. Check the beam is level in both directions before securing – a small error here becomes a large problem by the time walls and roof are in place. Double-check level after tightening, as torquing the bolts can introduce slight movement.
Our cordless impact driver guide covers the tools best suited to driving the volume of structural fixings a treehouse requires – a decent impact driver makes the job significantly faster and less physically demanding than a standard drill driver. Once the platform is solid and confirmed level, all subsequent construction is considerably more straightforward.
Walls, roof and access
For a children’s play treehouse, solid walls to at least 900mm height around the platform perimeter are recommended over open railings. Solid walls prevent children from accidentally pushing through gaps and provide weather protection that extends the usability of the space through more of the year. Frame the walls from 75mm x 50mm treated timber studs, fix the frame to the platform decking, and clad with exterior-grade plywood or shiplap boarding, leaving openings for windows and the entry point.
A simple mono-pitch or apex roof clad with roofing felt and finished timber battens provides adequate weather protection for a play structure. A cordless jigsaw is the right tool for cutting roof rafters to angle and for shaping any decorative elements in the cladding or fascia boards. The access ladder should have rungs at consistent spacings – 250-300mm apart is comfortable for children – with handrails at both sides and secure fixings at top and bottom. An angle of 60-70 degrees from horizontal gives a good balance between compactness and ease of climbing for children.
Safety and maintenance
Inspect the treehouse at least once a year for structural integrity. Check every visible fixing for corrosion, probe any timber joints and end-grain for soft rot, and look at the tree itself for any sign of disease, cracking or structural change. Trees grow continuously and a fixing that was under no stress in year one may be bearing load differently by year five as the trunk expands and the canopy shifts with the prevailing wind. Annual inspection catches problems before they become safety issues.
Check the treehouse before each play session during the first season and after every significant storm throughout its life. The inspection takes five minutes and is the single most important ongoing maintenance task. Apply a fresh coat of exterior wood preservative to all exposed timber every two to three years – this is the single most effective thing you can do to extend the life of the structure, particularly at any end-grain exposure where water can track into the timber most easily. If you are also improving the surrounding garden area, our guide to garden room structures covers the broader principles of outdoor building in a UK climate that apply equally to any permanent timber structure in the garden.
Share on socials: