At a glance
A loose banister is more than an annoyance – it is a safety hazard, particularly in homes with young children or elderly residents. UK building regulations require that stair handrails are capable of withstanding a lateral load of 0.36 kilonewtons per metre, and a banister that wobbles visibly is failing to meet that standard. The good news is that most banister faults are diagnosable and fixable with basic woodworking tools and materials in a single afternoon. The key is identifying whether the fault lies with the newel post, the individual balusters or the handrail itself, as each has a different repair method.
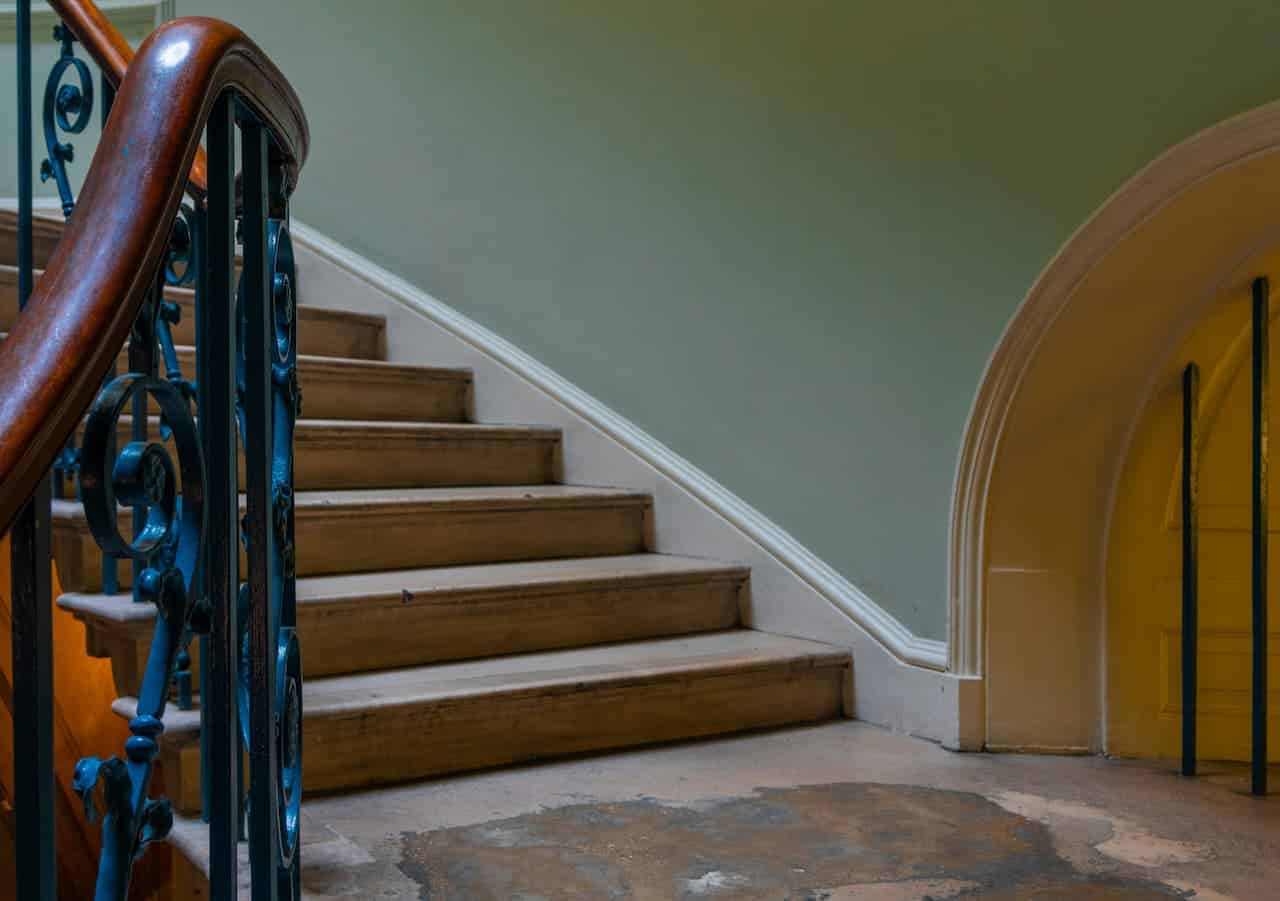
Staircase repairs can feel daunting because the structure looks complex, but most domestic timber staircases in the UK are built to a straightforward and consistent design. Once you understand how the components connect – how the newel post is fixed to the floor or string, how balusters are held in the rail and tread, how the handrail connects to the newels – the appropriate fix for each fault becomes obvious. This guide covers every common banister fault in detail, with the correct repair for each.
Diagnosing the fault
Grip the handrail and push and pull it firmly in every direction – sideways, inward and outward, and up and down. Note exactly where the movement is originating. If the whole handrail assembly moves together, the fault is likely in a newel post. If the handrail itself flexes or moves but the newel posts hold firm, the handrail connection to the newels needs attention. If individual balusters rattle, wobble or are loose from the rail or tread, that is the baluster fixings. A staircase can have more than one fault simultaneously – work through each component in turn.
Check the newel post at the bottom of the stair (the bottom newel) most carefully – this takes the most lateral load and is the most common source of significant movement. Push the top of the post firmly from side to side and look at the base to see where the movement originates. A bottom newel that bolts through the floor and is loose at the bolt needs tightening. One that is glued and pinned and has come free needs additional structural fixings. Upper newels at landings are usually bolted through the landing joists and come loose when the bolt works free.
Do not use a loose banister while it is being repaired. If the newel post is significantly loose, tape off the staircase or use an alternative route while the repair is carried out and the adhesive cures. A banister that appears to hold for normal use can fail under sudden load – particularly if someone trips and puts their full weight on the rail suddenly.
Fixing a loose newel post
The bottom newel post on most UK staircases is fixed to the floor in one of three ways: bolted through a timber floor with a long bolt hidden inside the post, glued and pinned to a plinth, or fixed to the stair string with a concealed metal bracket. Identify the fixing method by examining the base of the post. If bolted, the bolt head is usually concealed beneath a decorative wooden cap that unscrews or lifts off. Tighten the nut with a spanner – this resolves the wobble in the majority of cases. If the thread has stripped, replace with a longer or larger diameter bolt.
If the newel is glued to a plinth and has come free, inject PVA glue into the joint gap, clamp the post upright and allow to cure fully – 24 hours minimum. For additional strength, drill through the post base at an angle and drive a long structural screw into the floor or plinth. Cover the screw head with a wooden plug. For newel posts that are fixed to the stair string and have worked loose, the fix is usually a new bracket or a diagonal coach bolt driven through the post and into the string. This is more involved but fully achievable with a long drill bit and a spanner. The structural principles involved in timber repairs apply equally to outdoor structures – the guidance on building a garden fence covers post fixing techniques in concrete and timber that share the same logic as securing an internal newel post.
Identify the fixing method
Examine the base of the newel post. Look for a decorative cap concealing a bolt, evidence of glue and pins at the plinth, or a metal bracket connecting post to string.
Tighten or reattach the primary fixing
Bolt fixing: remove cap, tighten nut with spanner. Glued plinth: inject PVA, clamp upright for 24 hours. Bracket: tighten or replace bracket screws.
Add supplementary fixing if needed
Drill an angled pilot hole through the post base and drive a long structural screw into the floor or plinth. Plug the hole with a wooden dowel and sand flush.
Test before returning to use
Once adhesive has fully cured, apply firm lateral pressure to the top of the post in all directions. There should be no movement at all. If any remains, add a second supplementary fixing.
Fixing loose balusters
Balusters (the vertical spindles between the handrail and the tread or string) come loose in two ways: they pull free at the bottom where they sit in a groove or dovetail in the tread or string, or they work loose at the top where they fit into a groove in the underside of the handrail. For balusters fixed into a routed groove with a fillet strip, remove the fillet, re-glue the baluster base, refit the fillet and pin it with a brad nailer or fine pin nails. For balusters that are dowelled or mortised, inject PVA glue into the joint, clamp or wedge firmly and allow to cure fully before re-use.
If a baluster is missing or broken, replacements in standard profiles are available from timber merchants and staircase suppliers. Take the dimensions of the existing balusters and the spacing between them. Fitting a replacement follows the same process as the original – cut to length, glue into position top and bottom, pin the fillet back in place. Paint or varnish to match the existing finish once the glue has cured. A banister with several loose or missing balusters may indicate a generally tired staircase – it is worth doing a thorough inspection of all fixings while the work is underway.
Fixing a loose or wobbly handrail
A handrail that wobbles but whose newel posts are solid has usually pulled away from the newels at the rail-to-newel joint. On most UK staircases this joint is either a rail bolt (a long bolt that runs horizontally through the handrail into the newel, tightened with a barrel nut inside the rail) or a mortise and tenon joint secured with glue and a pin or dowel. For rail bolt fixings, the barrel nut is accessed through a small hole in the underside of the handrail – reach in with a spanner or purpose-made rail bolt tool to tighten it. If the bolt itself has worked loose in the newel, it may need replacing with a slightly larger diameter bolt with a rawl plug in the newel if the original hole has worn.
For a mortise and tenon joint that has dried out and separated, inject wood glue into the gap, clamp firmly and allow to cure. Where clamping is impractical, drive a screw through the side of the newel at a slight angle into the tenon to draw the joint tight while the glue cures. Plug and sand the screw hole. The handrail on a half-landing can also become loose at the wall bracket fixing – check all wall brackets are secure and the wall plugs are still holding. Replace any loose wall plugs with larger diameter plugs and longer screws.
Stair creaks alongside banister repairs
A creaking staircase and a loose banister often occur together as a staircase ages and the timber dries. Creaking treads are usually caused by the tread rubbing against the riser below or the string at the side. From above, drive screws at an angle through the tread into the riser and string to eliminate movement. From below, if the staircase underside is accessible, glue and screw wooden blocks into the junction of the tread and riser – this permanently eliminates the creak by preventing relative movement. Wedges driven into the gaps between the tread and string from below are an equally effective traditional fix. Fixing creaks at the same time as banister repairs makes sense as the staircase will need to be taken out of use briefly for both, and doing them together is more efficient than two separate jobs.
Finishing and regulations
Once all structural repairs are complete and adhesive has fully cured, any exposed fixings should be plugged, filled and finished to match the existing paintwork or varnish. Use a flexible wood filler for any small gaps or cracks, sand smooth and apply matching paint or varnish. Test the completed repair by applying firm lateral pressure to every repaired component before returning the staircase to use.
UK building regulations require that handrails on stairs are between 900mm and 1000mm above the pitch line of the stair, and that balusters are spaced so that a 100mm sphere cannot pass between them – an important consideration if you are replacing or repositioning any balusters as part of the repair. The same attention to structural detail that applies to indoor repairs is equally important outdoors – the guidance on building a raised patio covers similar considerations around load-bearing structures, balustrades and safe fixing methods that are directly relevant to staircase repair work. For any structural work that may affect the load-bearing elements of the stair, consult a structural engineer or qualified joiner before proceeding. The banister is a safety-critical component and the repair must be as solid as the original construction – or better. For a full picture of common household repair priorities, the guidance on reading your energy meter is a useful reminder that keeping on top of small maintenance tasks – from banister bolts to meter readings – keeps a property in good order and avoids larger problems developing unnoticed.
Share on socials: